Ever wished you knew more about the core WordPress Gallery? While there are plenty of dedicated WordPress gallery plugins, the core WordPress Gallery functionality is still one of the easiest ways to add galleries to WordPress.
In this post, you’ll learn everything you could ever want to know about the WordPress Gallery. By the end, you’ll know:
- Some history on how the current WordPress Gallery came to be
- How to use the basic WordPress Gallery
- A deeper look at the shortcode attributes that power the WordPress Gallery
- How to style the WordPress Gallery with CSS
- How to add a lightbox effect to the WordPress Gallery with code
- Some helpful plugins to enhance the WordPress Gallery
- How to better organize the images that you use in your WordPress galleries
That’s a lot to cover, so let’s dive right in!
What is The WordPress Gallery?
I’ll keep this brief because it’s not exactly top secret information. But, in case you’re unfamiliar, the WordPress Gallery is a core WordPress function that allows users to create a basic gallery from images that they upload to the WordPress media library.
By default, the core WordPress Gallery feature is minimal- just a basic grid based on a number of columns that the user selects. But it’s helpful for its ease of use and the fact that it’s baked into the WordPress core software.
A Brief History of the WordPress Gallery
The WordPress Gallery function was originally released as part of WordPress 2.5 “Brecker” all the way back in March 2008. Yup! We’re not too far off the WordPress Gallery’s 10-year birthday. It might even be 10 years old by the time you’re reading this post!
In its first iteration, the gallery was initiated by a simple [ gallery ] shortcode that put all of the images uploaded to a post into a gallery. Interestingly, 2.5 was also when the shortcode API was introduced. Remember a time without shortcodes? Oh, my.
You can see one of Matt Mullenweg’s original gallery example posts here, though the styling has come a long way since the original release back in 2008.
The Gallery Feature Gets a Facelift
In WordPress 3.5 “Elvin”, the core gallery feature got its first major facelift. WordPress got a new media manager that allowed users to:
- Insert multiple galleries in a post thanks to a modification to how the shortcode functions
- Rearrange gallery items with drag and drop reordering
- Edit captions inline
- Independently order gallery items via the shortcode
No More Inline Styles
In WordPress 3.9 “Smith”, the WordPress Gallery received another update. On the backend, the core team made the decision to do away with inline styles in HTML5 mode.
And in a more user-facing capacity, users also got the ability to preview their WordPress galleries directly in the WordPress Editor.
While there are always small tweaks going on, that generally takes us to where we are today.
How to Use the Regular WordPress Gallery Functionality
Note – in order to make this post accessible, this section is geared towards how to use the basic WordPress Gallery functionality from inside the WordPress dashboard. If you’re already an experienced WordPress user or developer, you might find this section a little basic, so feel free to click this link to skip ahead to a more in-depth look at the WordPress Gallery.
To use the WordPress Gallery functionality, you need to be in the regular WordPress Editor. Remember – everything happens via the WordPress media library, so things should feel pretty familiar if you already know how to insert single images into your WordPress content.
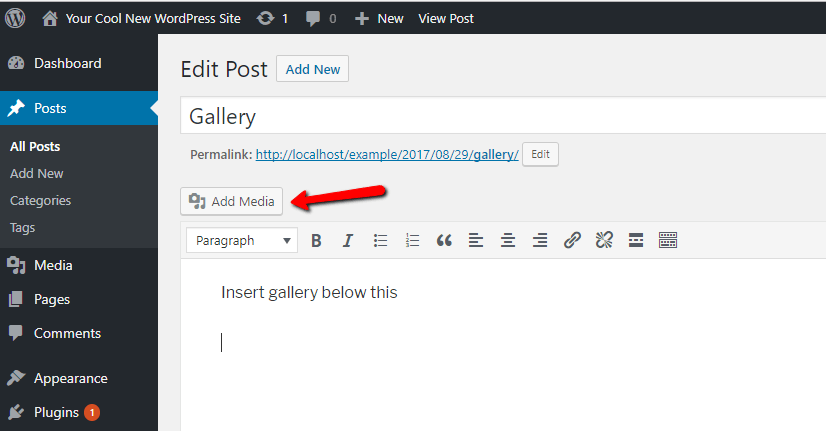
To get started, position your cursor where you want to insert your gallery and click Add Media:
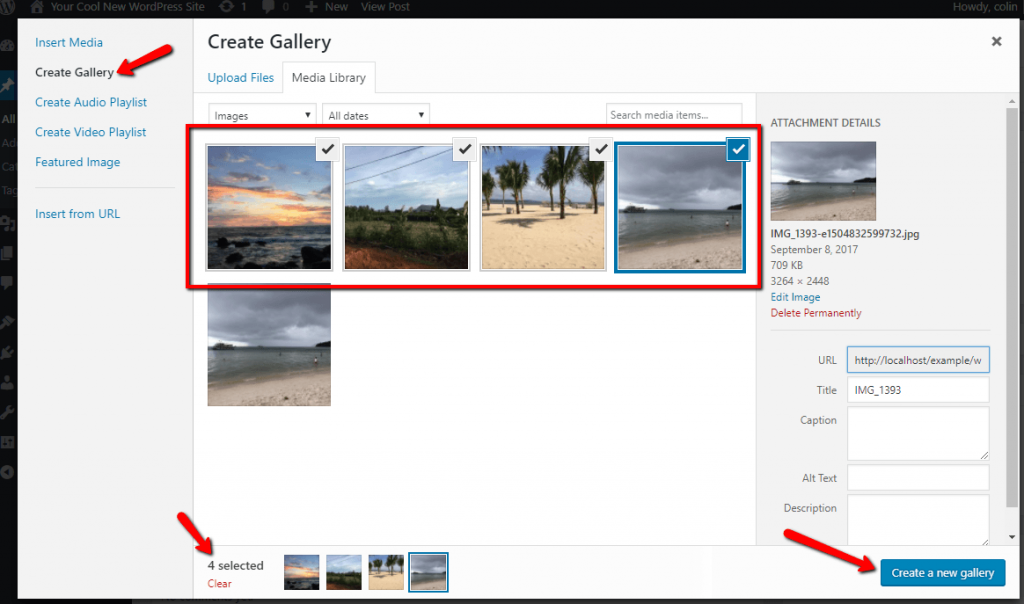
Then, go to the Create Gallery tab. Here, you can either upload new files or select multiple existing images to use in your gallery. Once you’ve selected the images that you want, click Create a new gallery to continue:
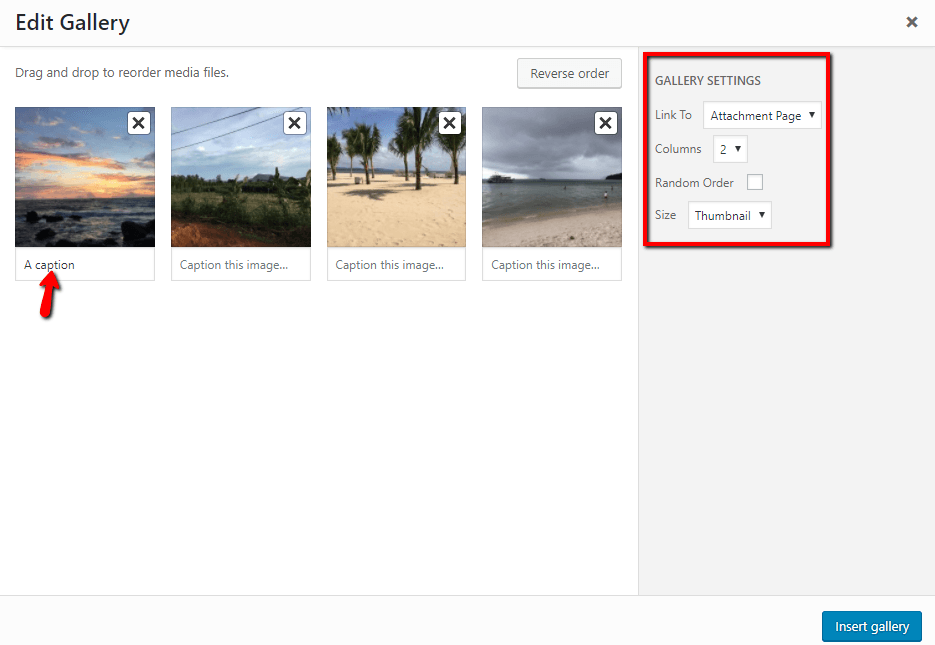
On the next screen, you can:
- Choose what each image links to (or remove links)
- Select how many columns to use in your gallery
- Rearrange the image order via drag and drop or choose to randomize the order
- Choose the default size for your gallery items
- Add captions to each image in the gallery
Once you’re done, click Insert gallery to add the gallery to your post:
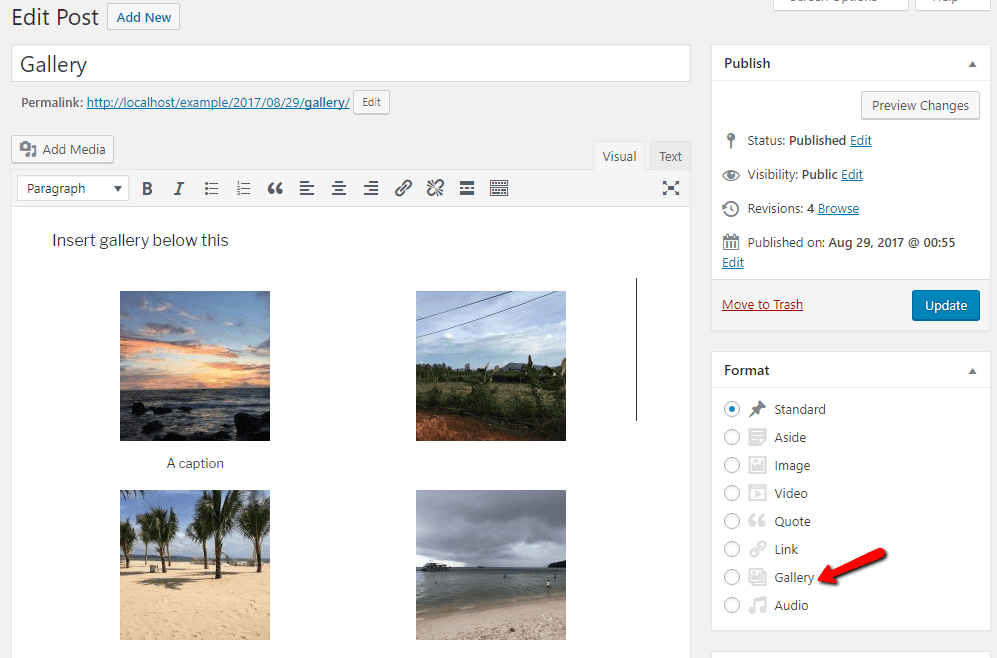
You should see a live preview of your gallery right in the WordPress Editor. If it looks acceptable, you can feel free to publish or update your post to push your gallery live.
If your theme supports it, you may even want to choose the Gallery post format if your entire post is dedicated to the gallery that you just created:
Next, we’ll get a little bit more advanced and take a peek at what’s actually going on behind the scenes with the WordPress Gallery shortcode.
Diving Into the WordPress Gallery Shortcode
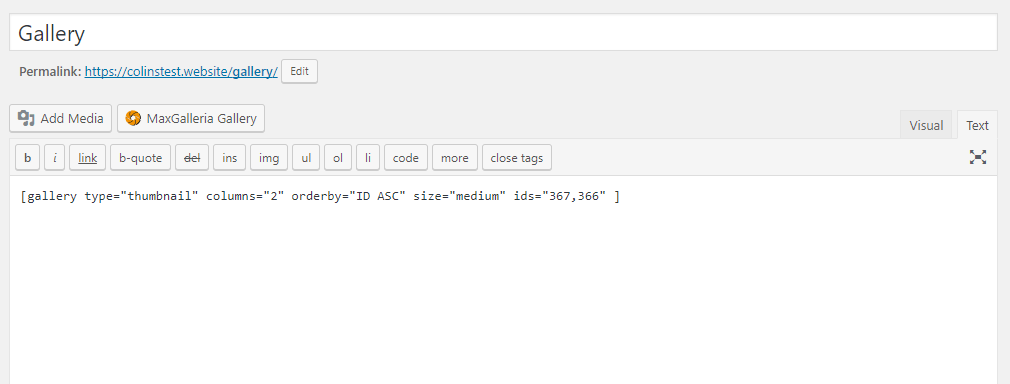
While you see a live gallery preview when you’re in the Visual tab of the WordPress Editor, the WordPress Gallery is actually powered by shortcodes, which you can see if you switch over to the Text tab of the WordPress Editor:
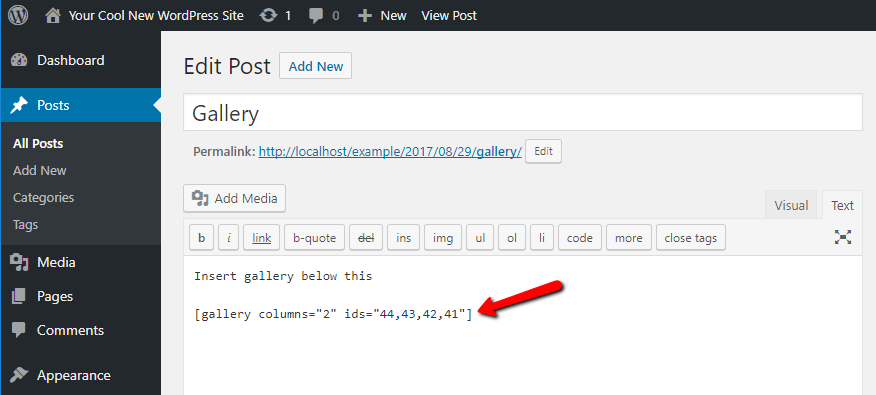
That’s the exact shortcode powering my example from above.
If you’d prefer, you can always opt to work directly with the shortcode instead of going through the media library interface. Not only can this be a faster method for creating galleries if you’re working with lots of galleries, it also gives you a few other neat options that aren’t available in the media library interface.
In the example above, you can see that the shortcode has two attributes:
- include – specifies the images to include by their image ID
- columns – specifies the number of columns to use
Those aren’t the only basic attributes you can use in shortcodes, though. Here are some others:
orderby
Allows you to specify how to sort the images in the gallery:
- menu_order – the order as shown in the WordPress media library
- title – order by the title of each image in the WordPress media library
- post_date – order by the date an image was uploaded
- rand – randomize the order
- ID – order by image ID
For each sorting option, you can also use orderby to sort between ascending (ASC) and descending (DESC).
size
Allows you to specify the size of the images used in the gallery. Options are:
- thumbnail
- medium
- large
- full
- Any custom images sizes that you’ve registered
id
Not to be confused with ids, this creates a gallery that includes all images attached to a specific post ID.
For example, to create a gallery that:
- Pulls all images from post ID 33
- Uses 3 columns
- Orders by post date descending
- Uses medium image sizes
You could use this shortcode (with the beginning and ending spaces removed):
[ gallery columns="3" id="33" order="DESC" orderby"post_date" size="medium" ]
Using Advanced WordPress Gallery Shortcode Attributes
Beyond those basic shortcode attributes, WordPress also includes more advanced attributes that give you even more flexibility:
link
Specifies where each image file links to:
- file – each gallery items links to the actual image file
- none – no link
Later on, we’ll use this link attribute to create a lightbox gallery when a user clicks on an image.
itemtag, icontag, captiontag
Lets you add an XHTML tag that encloses each relevant part of the gallery.
include, exclude
Not as helpful since the introduction of ids in WordPress 3.5, but these still allow you to:
- Include specific images
- Exclude specific images
Note – you cannot use both at the same time.
Using the Gallery Shortcode in Theme Template Files
If you want to use a WordPress Gallery directly in your theme’s template files, it’s possible to insert your gallery directly into your theme by using the do_shortcode() function.
For example, to insert the gallery shortcode for our previous example, you could use:
<?php echo do_shortcode('[ gallery columns="3" id="33" order="DESC" orderby"post_date" size="medium" ]'); ?>
Styling the WordPress Gallery With CSS
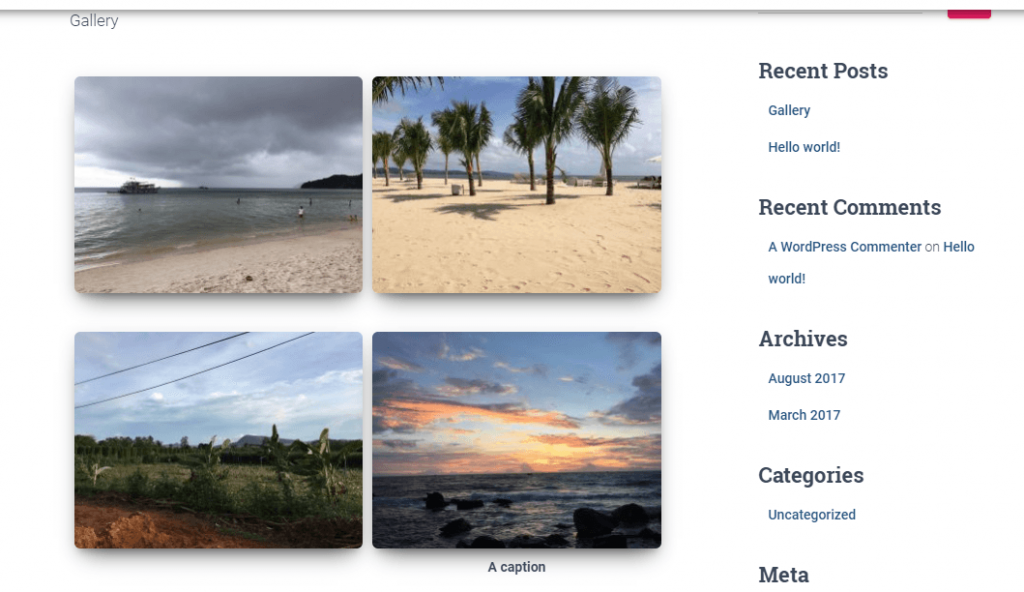
Many themes nowadays already include custom styling. For example, here’s what my previous gallery example looks like using a different theme (with nothing else changed):
With that being said, you can always go in and change how a theme handles galleries using your own CSS.
Adding your own custom CSS to WordPress galleries is fairly straightforward if you already have a basic understanding of CSS.
To give you an idea of the selectors that you’ll need, here are the gallery styles pulled straight from the default Twenty Seventeen theme:
.gallery-item {
 display: inline-block;
 text-align: left;
 vertical-align: top;
 margin: 0 0 1.5em;
 padding: 0 1em 0 0;
 width: 50%;
 }
 .gallery-columns-1 .gallery-item {
 width: 100%;
 }
 .gallery-columns-2 .gallery-item {
 max-width: 50%;
 }
 .gallery-item a,
 .gallery-item a:hover,
 .gallery-item a:focus {
 -webkit-box-shadow: none;
 box-shadow: none;
 background: none;
 display: inline-block;
 max-width: 100%;
 }
 .gallery-item a img {
 display: block;
 -webkit-transition: -webkit-filter 0.2s ease-in;
 transition: -webkit-filter 0.2s ease-in;
 transition: filter 0.2s ease-in;
 transition: filter 0.2s ease-in, -webkit-filter 0.2s ease-in;
 -webkit-backface-visibility: hidden;
 backface-visibility: hidden;
 }
 .gallery-item a:hover img,
 .gallery-item a:focus img {
 -webkit-filter: opacity(60%);
 filter: opacity(60%);
 }
 .gallery-caption {
 display: block;
 text-align: left;
 padding: 0 10px 0 0;
 margin-bottom: 0;
 }
Beyond that code, there’s also some other CSS setting up the responsive grid for columns. I’m assuming you don’t want to edit the basic responsive grid layout, though.
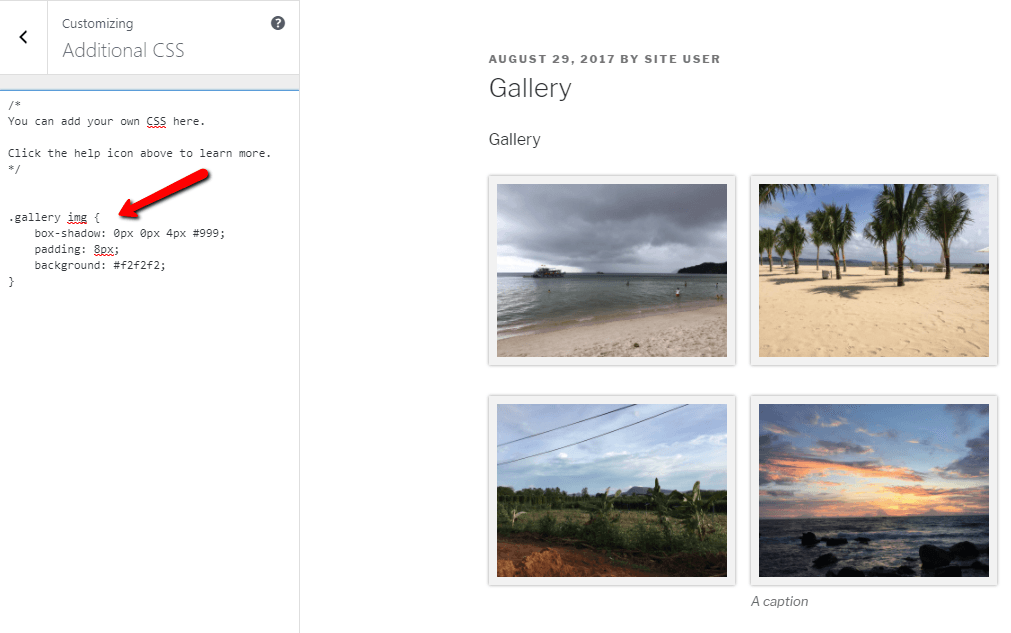
Generally, to style the actual images, you can use the .gallery img selector.
For example, to add some box shadow to the default Twenty Seventeen gallery layout, you could do something like this:
.gallery img {
 box-shadow: 0px 0px 4px #999;
 padding: 8px;
 background: #f2f2f2;
 }
Adding HTML5 Support for Galleries and Removing Default WordPress Gallery Styles
Most WordPress themes nowadays come with support for the HTML5 galleries feature introduced in WordPress 3.9, but on the off chance that your theme doesn’t allow it, you can add this short snippet to your functions.php file to enable HTML5 gallery support:
add_theme_support('html5', array('gallery', 'caption'));
There’s also the older use_default_gallery_style that was introduced in WordPress 3.1, but this snippet already defaults to false if HTML5 gallery support is on, so it’s redundant to use with the previous snippet.
Add jQuery Lightbox to WordPress Gallery With Code
One feature that many users want from WordPress galleries is lightbox galleries. While you can find plenty of WordPress plugins that can add lightbox galleries to the default gallery (I’ll discuss some of those in a second), I think it’s more interesting to first look at how to actually add lightbox galleries manually with code.
To do that, we’ll use Leandro Vieira Pinho’s jquery-lightbox, which is a jQuery plugin based on Lightbox 2 by Lokesh Dhakar.
It’s fairly painless to get set up with the default WordPress Gallery. Here’s how to do it:
Step 1: Download and Extract the jQuery Plugin to Theme Folder
To get started, download the ZIP file from Leandro’s github page. Then, extract its contents to your theme’s folder.
For example, if you’re using Twenty Seventeen, you would extract the contents of the ZIP file to:
…wp-content/themes/twentyseventeen
It should look like this:
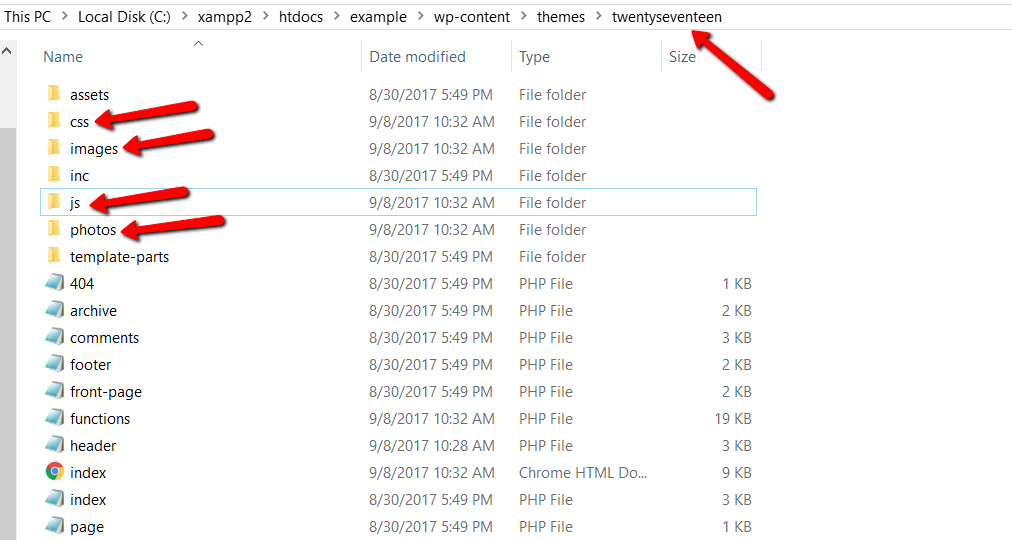
Once you’ve extracted the files, you’re ready to move on to the next step.
Step 2: Enqueue Lightbox JavaScript and CSS Files
Next up, you need to properly enqueue the JavaScript and CSS files. To do that, add the following two code snippets to your theme’s functions.php file:
wp_enqueue_script( 'jquery-lightbox', get_stylesheet_directory_uri() . '/js/jquery.lightbox.js', array( 'jquery' ) );
 wp_enqueue_style( 'jquery-lightbox', get_stylesheet_directory_uri() . '/css/jquery.lightbox.css' );
Step 3: Activate Lightbox Gallery on Only WordPress Gallery Images
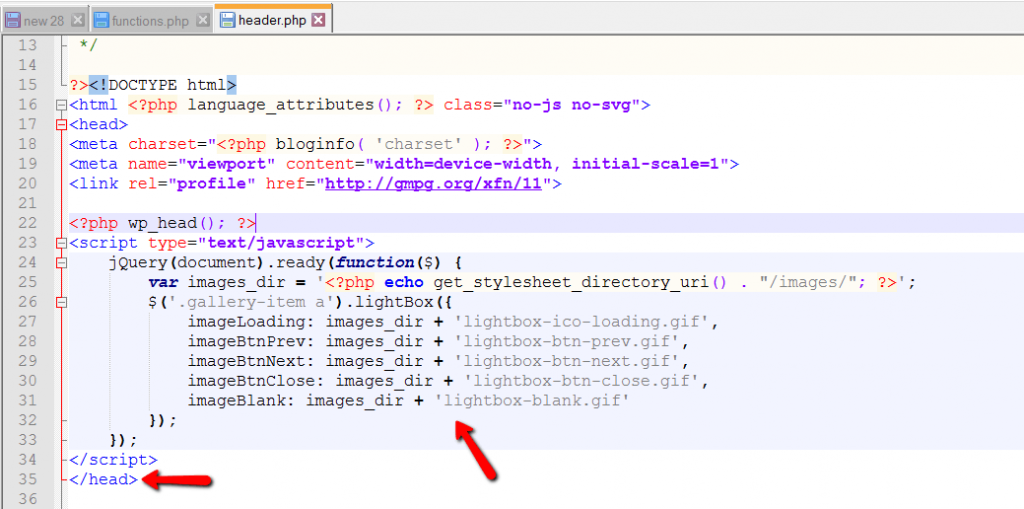
Finally, to actually make the lightbox gallery active, you need to add this short snippet (from Brandt Valentin) to the <head> section of your theme’s header.php file:
<script type="text/javascript">
 jQuery(document).ready(function($) {
 var images_dir = '<?php echo get_stylesheet_directory_uri() . "/images/"; ?>';
 $('.gallery-item a').lightBox({
 imageLoading: images_dir + 'lightbox-ico-loading.gif',
 imageBtnPrev: images_dir + 'lightbox-btn-prev.gif',
 imageBtnNext: images_dir + 'lightbox-btn-next.gif',
 imageBtnClose: images_dir + 'lightbox-btn-close.gif',
 imageBlank: images_dir + 'lightbox-blank.gif'
 });
 });
 </script>
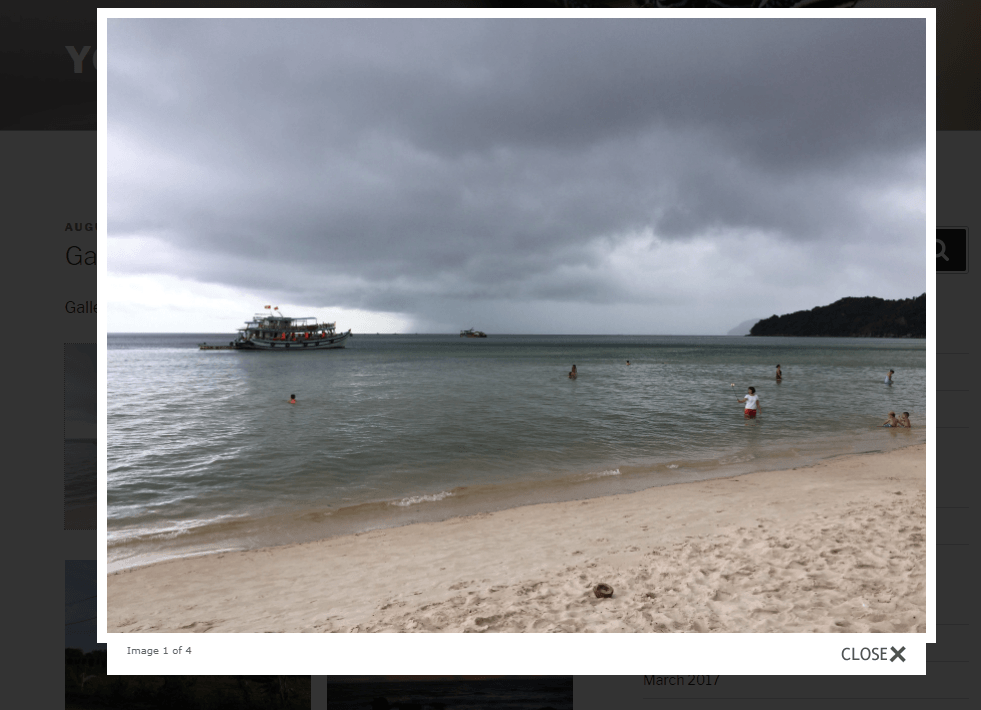
Step 4: Make Sure Your Gallery Images Link to Their File
Finally, make sure that your gallery images always link to the file, instead of using no link.
Remember, you can do this by adding the link=”file” attribute to the gallery shortcode or via the WordPress media library when you create the gallery.
Assuming your gallery images link to the file, you should see a nice lightbox gallery when you click on any image in your gallery:
That’s all there is to it!
Plugins to Enhance the Default WordPress Gallery
While I showed you some of the manual ways that you can work with WordPress galleries above, there are also plenty of plugins that tack on additional functionality to the default WordPress Gallery. Here are some helpful ones…
Easy FancyBox
The Easy FancyBox plugin adds support for the FancyBox jQuery lightbox extension. The plugin adds lightbox views to all images, including those in the default WordPress galleries.
Like the manual method, though, the FancyBox view will only work on images that link to their own image URL.
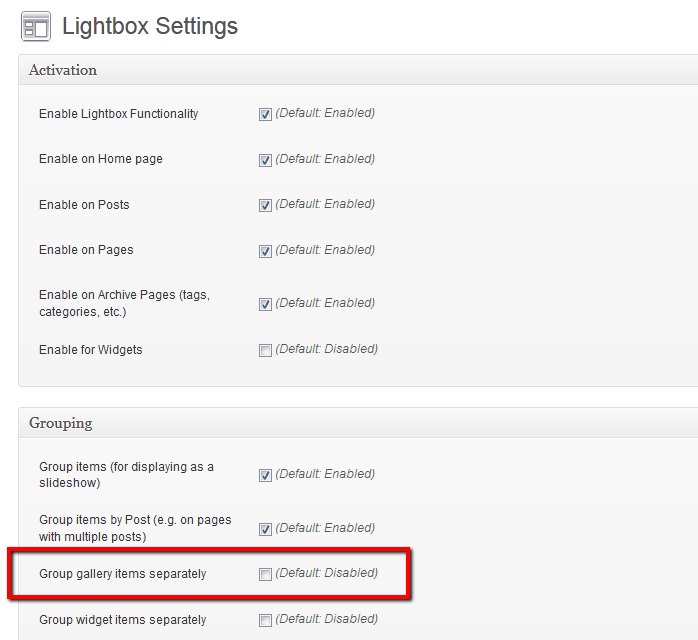
Simple Lightbox
Simple Lightbox is another popular plugin that gives you a bit more control over when the lightbox functionality gets activated. To use it, install and activate the plugin. Then, go to Appearance → Lightbox to customize how the plugin functions:
Jetpack
Jetpack includes a number of features that expand on the native WordPress Gallery with tiled and masonry galleries. We’ll publish a more in-depth guide on Jetpack galleries in the near future.
How to Organize The Default WordPress Gallery
If you use WordPress galleries infrequently, the regular WordPress media library is probably enough for your needs.
But if you find yourself using galleries often, you might want a better way to organize the images that you use in your galleries.
The WordPress Media Library Folders Pro plugin helps you organize your media library with actual folders just like you’d use on your computer. You can also use categories and tags, if you’d prefer.
How does that tie with the WordPress Gallery? Because Media Library Folders Pro actually integrates with the WordPress Gallery to help you generate gallery shortcodes right from the Media Library Folders Pro interface.
The JetPack WP Gallery button integrates both with the native gallery functionality, as well as Jetpack:
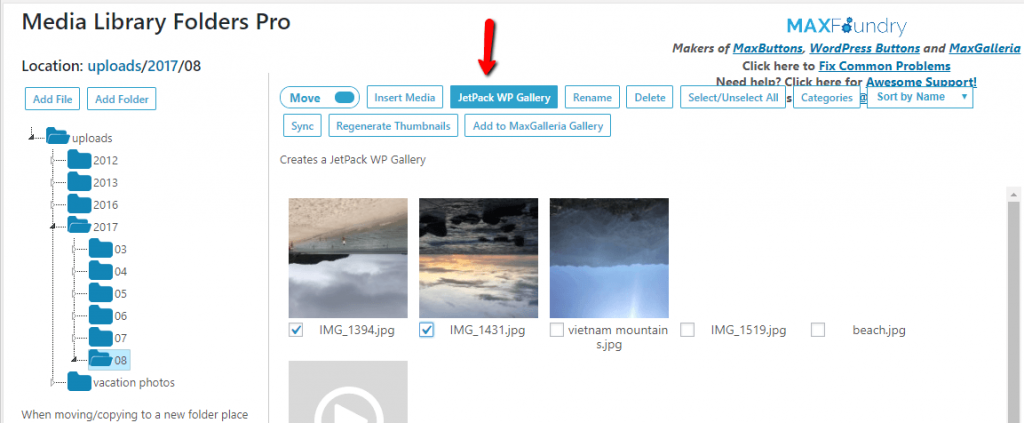
You can choose how to structure your gallery:

Then, when you insert the gallery, Media Library Folders Pro generates the proper gallery shortcode from the images that you’ve selected, no matter which post each image is attached to:
If you ever need to find the images that you used in the gallery, all you need to do is navigate to the folder instead of trying to comb through your entire WordPress media library.
You can even sync media uploads with your FTP server to use FTP to upload your gallery images.
Wrapping Things Up
The core WordPress Gallery functionality is something most WordPress users take for granted. But there are actually some interesting things going on behind the scenes.
While the WordPress media library makes it easy to create galleries, you can also accomplish the same thing using shortcodes and a variety of helpful attributes. You can even include WordPress Gallery shortcodes directly in your theme’s template files.
Delving deeper, you can also add your own CSS styling and even manually add a lightbox effect to the WordPress Gallery. Or, you can always use a plugin to achieve something similar.
And finally, if you want to better organize the images that you use in WordPress galleries, the Media Library Folders Pro plugin can help you generate the WordPress Gallery shortcode directly from a folder of images.
We hope you enjoyed this guide, and check back soon for an in-depth look at Jetpack galleries.