
If you’ve ever felt constrained by the WordPress default text editor, custom fields are your salvation.
Custom fields allow you to extend your WordPress content by adding flexible new “fields” to any of your WordPress edit screens.
In this post we’re going to explain how those fields help you and your users, and how to add custom fields to your WordPress site using a powerful plugin called Advanced Custom Fields.
Additionally, we’re giving you a detailed Advanced Custom Fields tutorial on:
- How to add custom fields to your WordPress edit screens
- How to display those custom fields on the front-end of your site
We’ll finish up with some plugins that work well to extend Advanced Custom Fields, as well as a few common FAQs/problems.
If you’re already familiar with the concept of custom fields and how they make it easier to create content, we recommend you click right here to jump straight to the Advanced Custom Fields tutorial section of this post.
What Are Custom Fields?
If you’ve used WordPress for any length of time, you’ve probably encountered custom fields, even if you didn’t know them by that name.
Custom fields allow you to assign something called “metadata” to your post. And yeah, that does sound a little jargony… but this is the concept that powers many of your favorite plugins and themes.
Basically, custom fields allow you to add additional data outside the normal WordPress edit fields. You can then use, format and/or manipulate this data in many helpful ways.
For example, if you want to add a dedicated review box for your readers to post product reviews, you might seek out a plugin that helps you do that with custom fields rather than trying to do manual formatting in the WordPress editor:
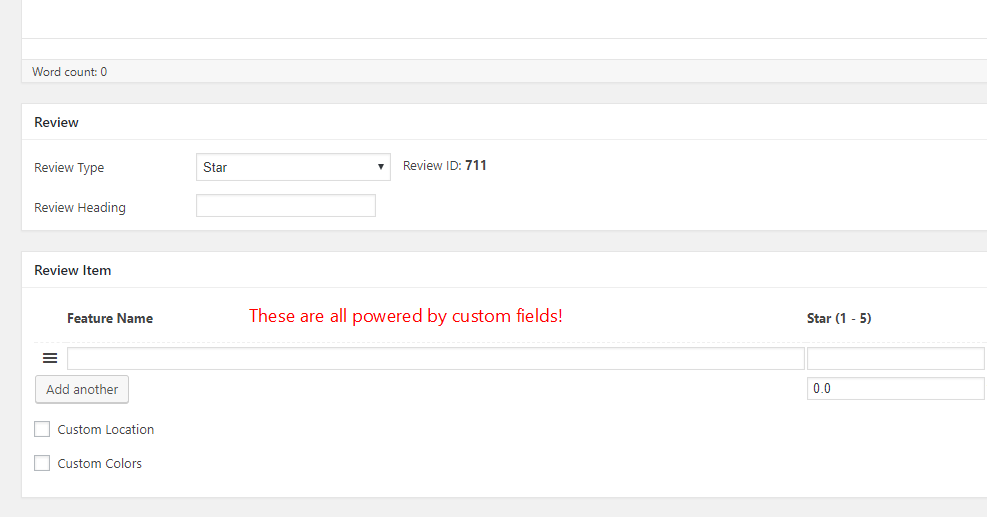
All those extra fields in the example above? They’re done with custom fields. And while many plugins use custom fields, you can also create custom fields by yourself.
Why Are Custom Fields Helpful to WordPress?
If you have a certain type of structured information that you need to display, custom fields make it easy to:
- Input that information in the various WordPress edit screens
- Display that information in specific places with consistent styling
Take the review box example above. While you could use the WordPress editor to meticulously style each individual review, it’s far easier to just input that information in custom fields and let your theme’s template files make everything consistent.
Custom fields aren’t just for front-end display. You can also use them to add other types of less visual metadata, like an expiration date for a piece of content.
How To Create Custom Fields On WordPress
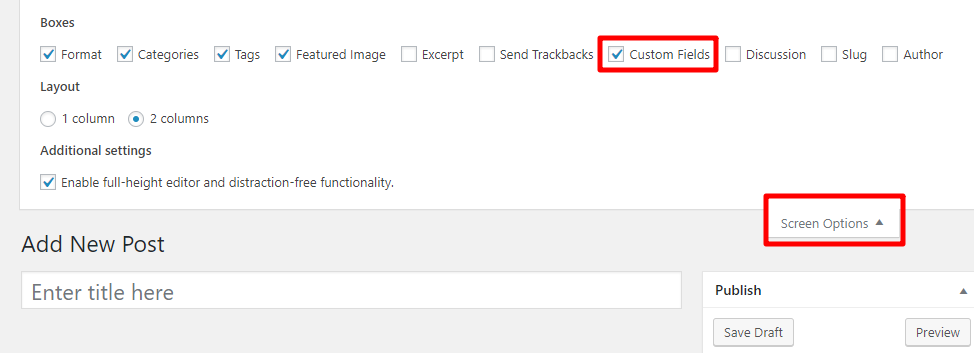
WordPress has a system for handling custom fields built into the core. You can access it in the WordPress Editor by clicking on Screen Options and checking the box for Custom Fields:
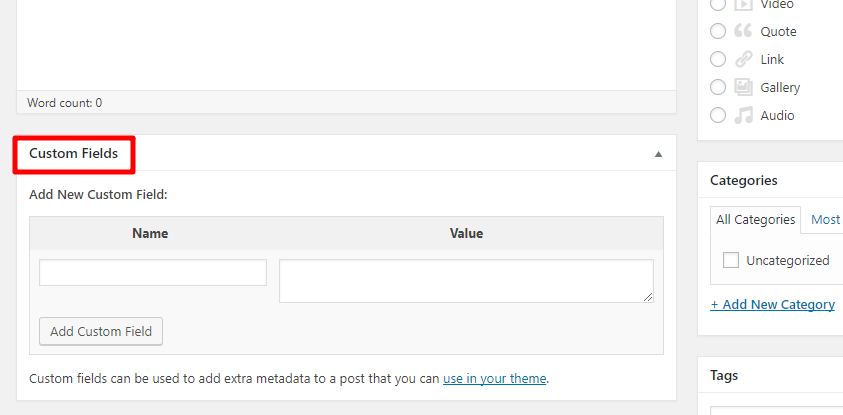
You’ll see a new meta box for custom fields underneath the WordPress Editor:
While this method does function, it’s not especially user-friendly, which is one reason that many developers and WordPress users turn to a plugin called Advanced Custom Fields.
Advanced Custom Fields makes it easy to add pre-defined custom fields and display those custom fields on your WordPress site.
Advanced Custom Fields started when developer Elliot Condon wanted a better way to handle custom fields for client projects. According to Elliot:
“ACF was my solution to avoid embarrassing ‘client training’ and ‘project handovers.’ The ability to create custom fields and modify the WP UI is a necessity for any client work, and before ACF existed, our options were ‘hacky’ to say the least. ACF started as a hobby project but has picked up speed over the years as more web developers adopt WP as their CMS of choice!
“ACF has become such a useful tool for a few reasons:
- The API is super easy to use, looks native and helps developers write cleaner and faster code,
- the UI seamlessly integrates into the WP backend, so clients feel comfortable editing content, and
- the plugin is dependable, robust and regularly updated!”
In the free version of Advanced Custom Fields, you can quickly add over 30 different field types to your WordPress “edit areas.” Edit areas are screens like:
- The WordPress editor (that is, the area where you write new posts or pages)
- Taxonomies (categories, tags, or custom taxonomies)
- Media interface
- Comments
- Custom options pages
Once you’ve created your custom fields, Advanced Custom Fields gives you simple PHP functions to display those fields on the front-end of your site.
How To Create Custom Fields Using Advanced Custom Fields
In this tutorial we’re going to add a field called Current Mood to the WordPress post editor and display it on the front-end.
While the example is fairly trivial, the concepts covered here can be applied to tons of uses that are unique to your site.
Step 0: Laying The Groundwork
In broad strokes, there are two parts to using this type of custom field:
- Create custom fields using the Advanced Custom Fields interface on the backend of your site.
- Edit your theme’s template files to tell WordPress where/when to display those custom fields.
In this section we’ll create a custom field, and then cover how to display the custom field in the next section.
The only thing that we’re going to assume before starting this tutorial is that you’ve already installed and activated the free version of Advanced Custom Fields. It’s listed at WordPress.org, so you can install it directly from your WordPress dashboard.
Once you’ve got it ready to go, you can create custom fields!
Step 1: Create A New Field Group
To get started, click on the Custom Fields option in your WordPress dashboard. Then, choose Add New next to the Field Groups heading:

A Field Group defines how a “group” of fields functions. Once you create the field group, you’ll be able to add individual custom fields to it.
In the Add New Field Group screen, you can:
- Add individual custom fields
- Choose which edit screen will display those custom fields
- Select how to display those fields on that edit screen
Basically, this interface controls everything except where to display those fields on the front-end version of your site.
Step 2: Add Custom Fields
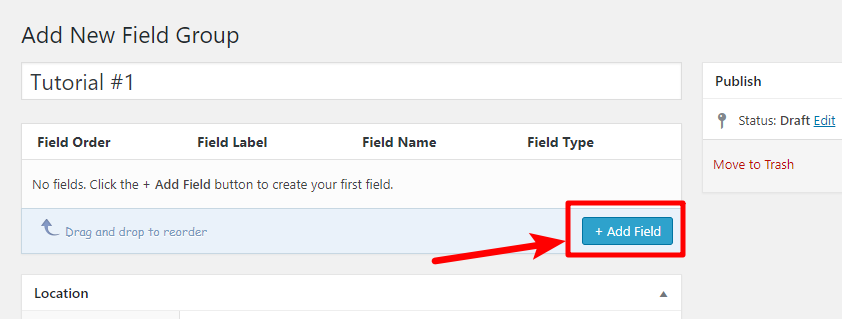
After you give your Field Group a title, you can jump straight into adding custom fields by clicking the + Add Field button:
When you hit the +Add Field button, a lengthy interface menu will slide out. The specific interface will depend on the Field Type that you select, but the same basic concept applies to all of them.
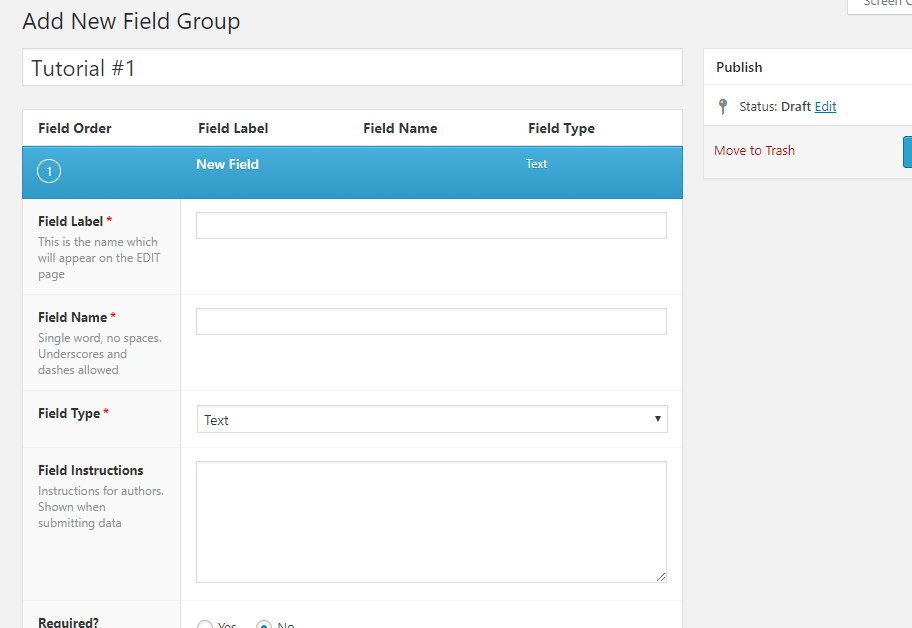
Here’s what the various options mean when you’re creating a text field:
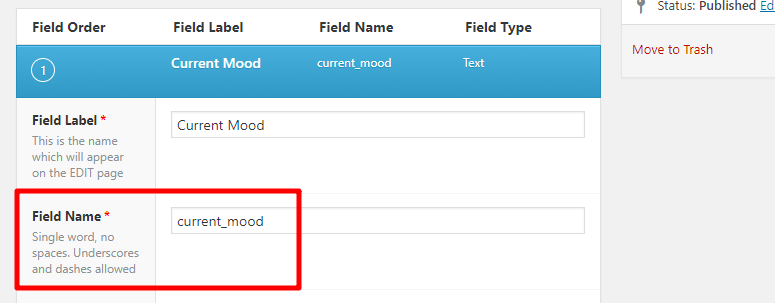
- Field Label – this is how your field will be named in WordPress edit screens – it doesn’t affect the front-end.
- Field Name – this affects the actual code that you’ll use to display the field on the front-end of your site. Usually you will leave it as the default value that Advanced Custom Fields generates.
- Field Type – this is where you choose what type of data will be entered in the field. For our example, we’ll use a simple text box, but you can also choose any one of the 30+ options.
- Field Instructions – these are internal instructions that will be shown in the WordPress edit screen.
- Required – is the field required or not?
- Default Value – if you want, you can pre-fill the field with an optional default value.
- Placeholder Text: text that appears within the field until a user starts typing.
- Prepend – lets you add information that appears before the input. This doesn’t affect the front-end of your site – it only appears on the backend to make the field easier to use.
- Append – the same as Prepend, except it appears after the input.
- Formatting – choose whether to convert HTML entered into the field into actual tags or just render it as plain text by selecting None.
- Character Limit – add an optional character limit for the field.
- Conditional Logic – add optional conditional logic to the field. This isn’t applicable to our example.
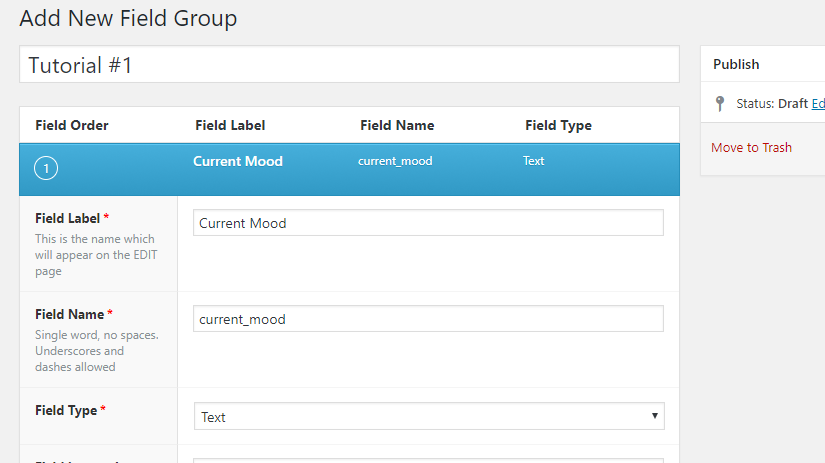
For our example, we’ll enter the following information and leave the rest of the fields as blank/the default:
- Field Label – Current Mood
- Field Name – current_mood
- Field Type – Text
- Required – Yes
- Prepend – My current mood is…
And that’s it for our example! In real life, you could always go ahead and add additional fields by repeating the process.
Step 3: Choose Which Edit Screen Will Display Custom Fields
In the Location box, will tell Advanced Custom Fields where you want to display the field(s) that you just created.
For our example, you can leave it as the default:
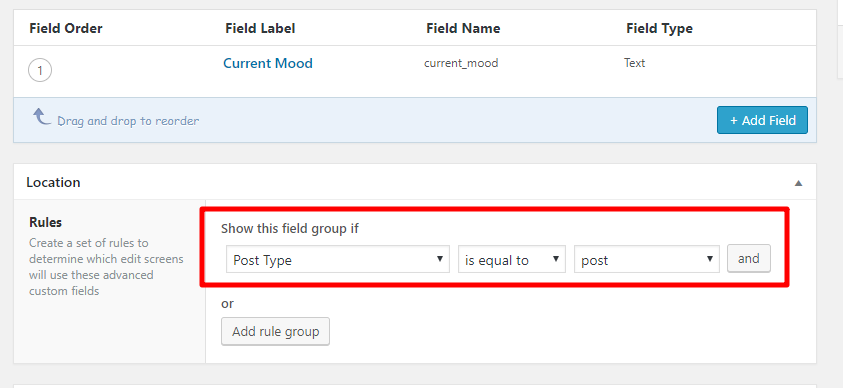
The default basically says “display these fields when a user is creating/editing a regular post.”
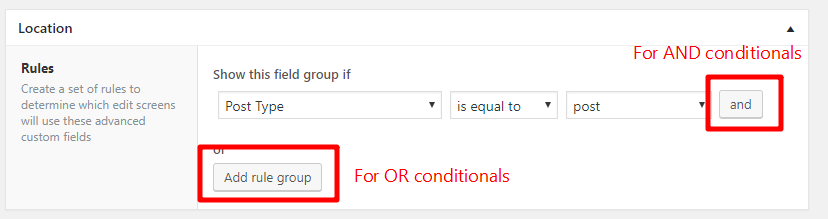
If you want to display them somewhere else, use the drop-downs to change the various criteria. You can also add And or Or conditionals to control where the fields display:
Step 4: Choose How To Display The Custom Fields
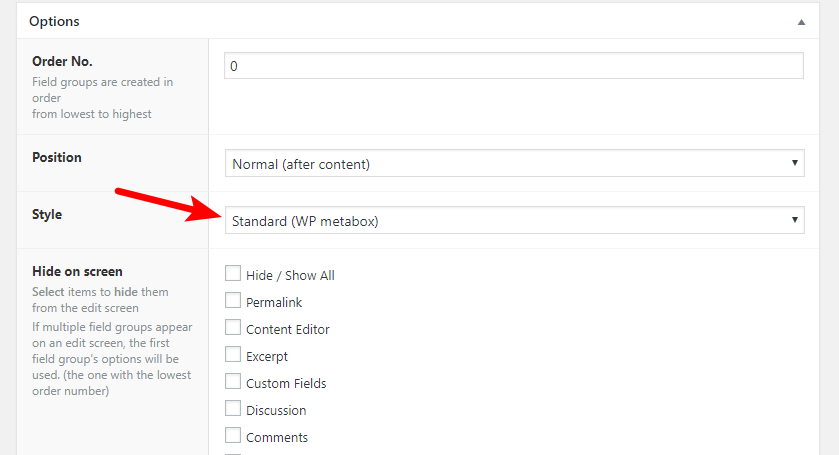
In the Options area, tell Advanced Custom Fields how to display your custom field boxes in the appropriate WordPress edit screen(s).
You have four options:
- Order No. – where to order this field group in relation to other field groups. Lower numbers mean a higher placement in the edit screen
- Position – whether to position the fields above/below the content editor or in the sidebar
- Style – whether or not to give the fields their own meta box
- Hide on screen – lets you hide default WordPress items by checking them
In our example, we’ll give the field its own meta box but leave the other options as defaults:
Step 5: Publish The Field Group
There’s only one thing left to do – hit that big Publish button!
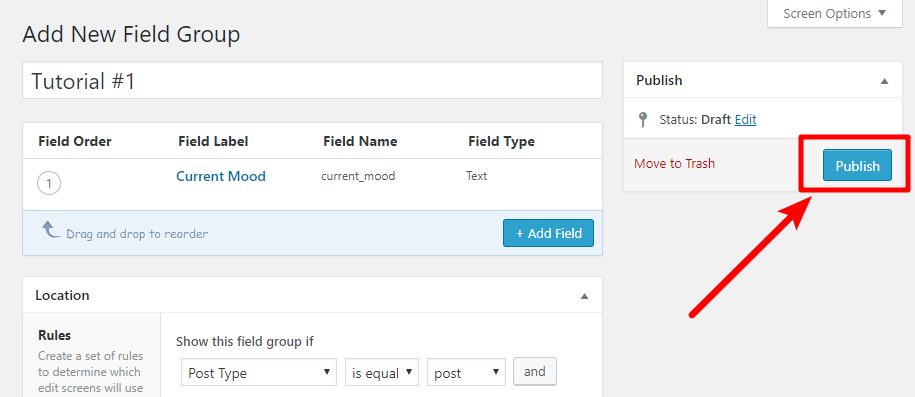
Now when you create or edit a regular WordPress post, you should see the meta box for your new field group:
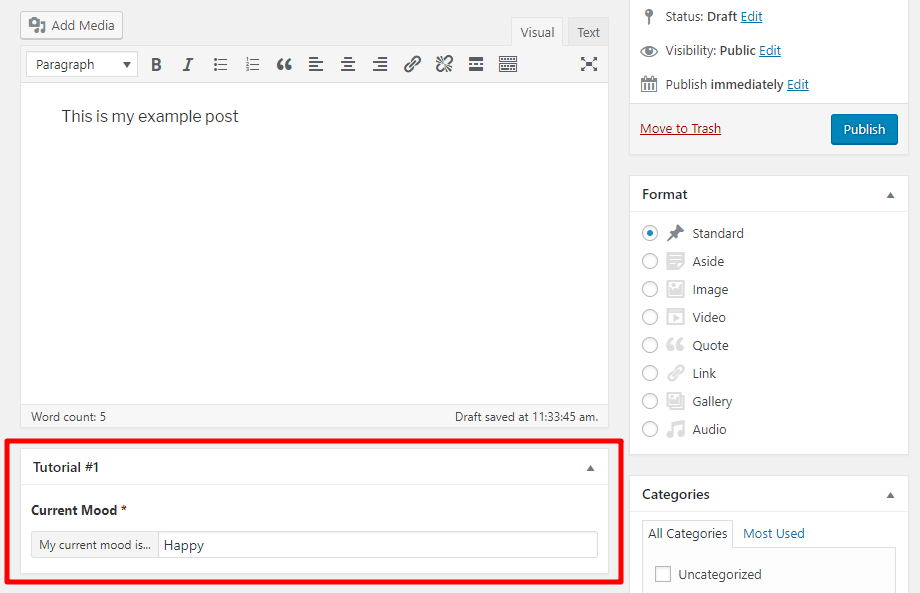
You can enter information in that box right away, but if you Publish your post, you’re not going to see anything on the front-end:
That’s because you still haven’t told WordPress where to display your custom field. To do that, you’ll need to edit your theme’s template files.
How To Display Advanced Custom Fields On the Front-End of Your Site
To display custom fields on the front-end of your WordPress site, you need at least a basic understanding of PHP. The process is fairly simple, but if you’ve never looked at code before, you might struggle a bit with where exactly you need to input the code snippet.
In our example, we’re going to automatically display our current mood right below the post title.
This is where Advanced Custom Fields shines, because while you still need to know some basic PHP, Advanced Custom Fields makes it as simple as possible.
Step 1: Open single.php In Your Editor
To get started, you need to edit single.php (you should do this in a child theme if you’re working on a theme made by someone else). This is the file that controls the layout for a single post.
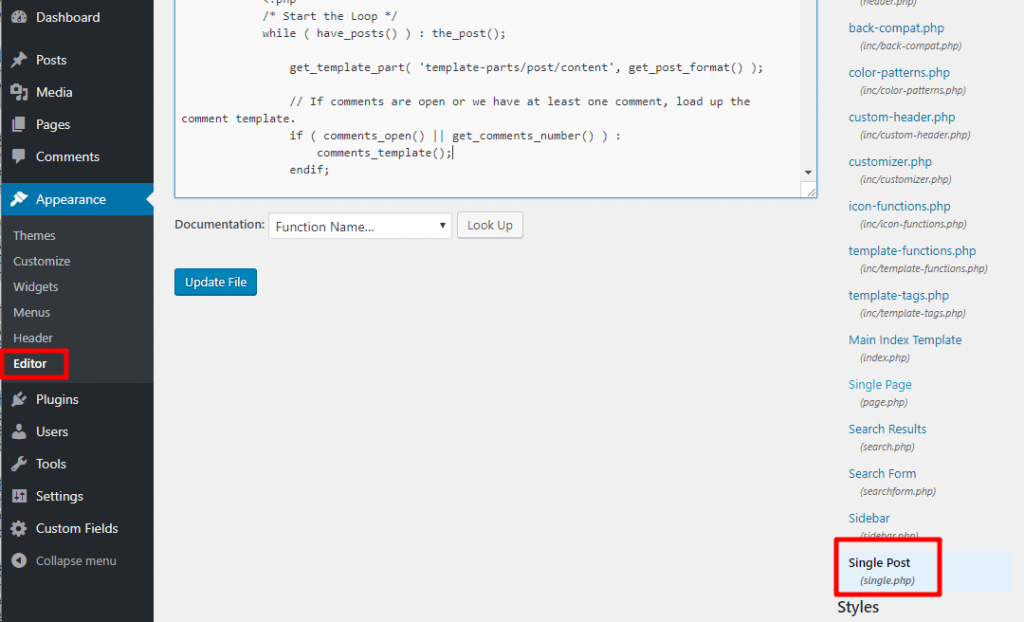
You can use the built-in WordPress code editor by going to Appearance → Editor and choosing single.php:
In our example, we’ll use Sublime Text because the syntax highlighting is helpful.
Some themes use different template parts instead of placing everything in single.php, so you might need to edit the actual file that contains the code for the WordPress content. This is why it helps to have at least a basic understanding of PHP. For example, in the default Twenty Seventeen theme, you need to edit the content template part instead of single.php.
Because each theme does this differently, we can’t cover every file type in this tutorial.
Step 2: Insert the_field Function
To display Advanced Custom Fields’ custom fields, use the the_field() function. Here’s the basic function:
<?php the_field('field_name'); ?>
Remember the Field Name you used when you created your custom fields?
Insert that into the field_name part of the function. So for our example, this is the code snippet that you need:
<?php the_field('current_mood'); ?>
To display it under the post’s title, you need to look for the_title in your theme’s template files:
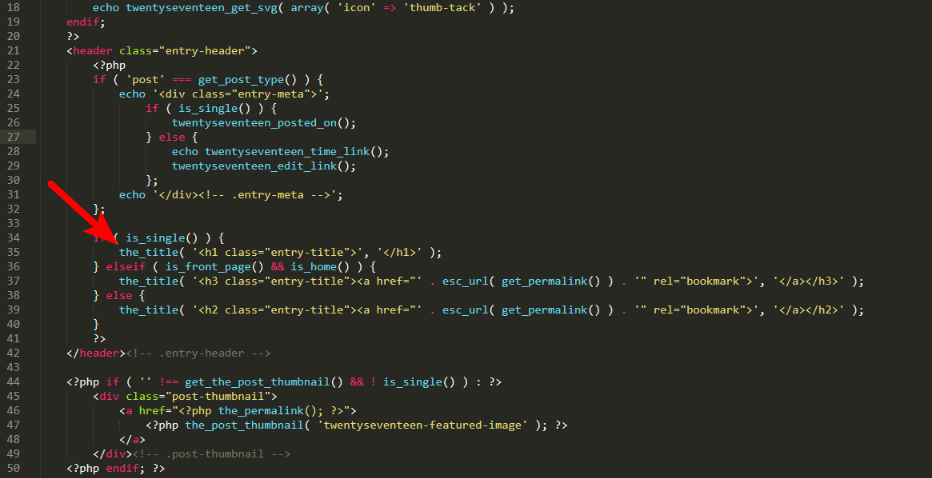
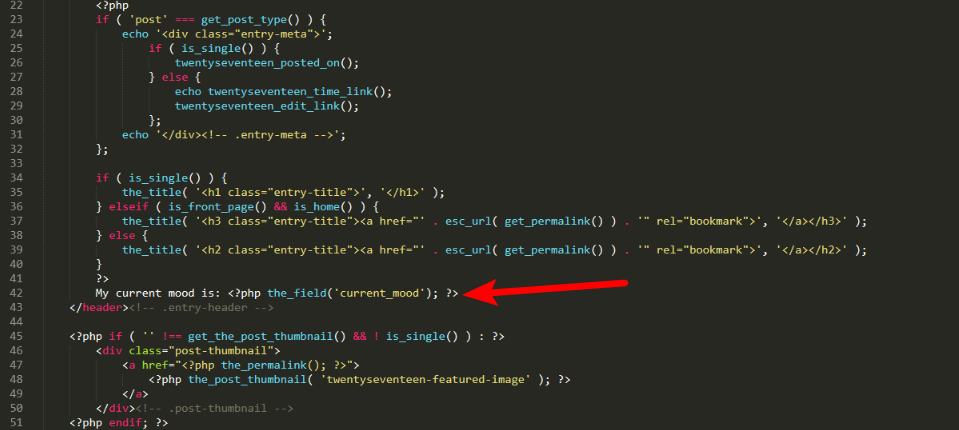
Then, paste the code snippet right below it. In real life, you might want to add some additional CSS to style things. And you can also add some text before the function to add some context like this:
My current mood is: <?php the_field('current_mood'); ?>
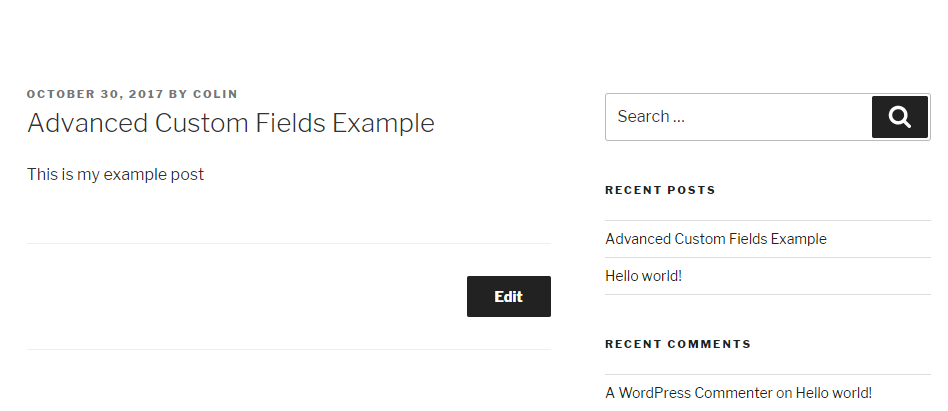
Now, save your changes and go look at your post again:
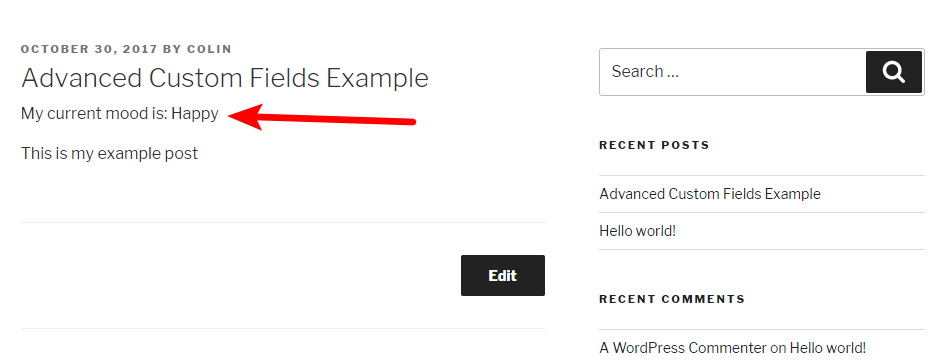
Voila! There’s your custom field for everyone to see.
While you’ll probably want to use Advanced Custom Fields to do more than just display your current mood, the basic principles are the same no matter what type of custom fields you use.
You can follow similar steps to create and display custom fields for:
- Maps
- Dates
- Numbers
- Taxonomies
- Images
- Etc.
Taking Things Further With Advanced Custom Fields
While this Advanced Custom Fields tutorial gives you a broad look at how to create and insert custom fields, Advanced Custom Fields can actually go a lot further.
One way to learn how to create more complex implementations is to read Advanced Custom Fields’ stellar documentation for:
And then, for more functionality, you can consider…
Advanced Custom Fields Pro: Even More Functionality
In the above tutorial, we used the free version of Advanced Custom Fields. But if you’re serious about creating custom fields, Advanced Custom Fields Pro adds a number of helpful features like:
- Repeater fields – add repeatable subfields for more flexibility during data entry.
- Gallery fields – add a gallery via a custom field.
- Flexible content field – this lets you create pre-made layouts out of groups of fields.
- More options pages – these give you even more control over your custom fields.
- Easy import/export – helps you move custom fields between websites.
- Improved front-end forms – lets you create an entirely new post on submission, plus improved form validation.
- Improved UI – the entire plugin gets a fresh new user interface.
A Deeper Look At Repeater Fields
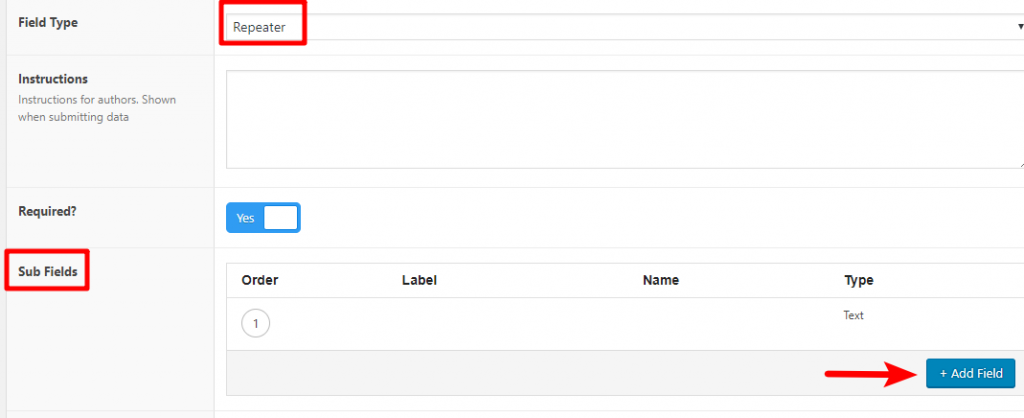
Repeater fields are an especially helpful tool, available only in the Pro version. They let you create a group of sub-fields that you can “repeat” as needed.
When you use repeater fields, you add sub-fields inside the repeater field much like you added regular fields in our example above:
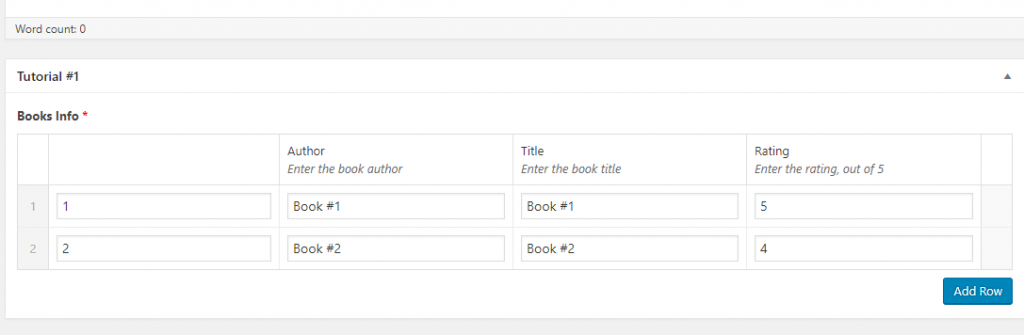
For example, let’s say you want to create a group of custom fields for “Books I’ve Read This Week.” You could use a repeater field to create a group of fields for:
- Author
- Title
- Rating
Then, you can easily add additional rows to display multiple books:
Just be aware that you’ll need a slightly different PHP function to loop through the repeater fields.
A Deeper Look At The Flexible Content Field
Like repeater fields, the flexible content field helps you add sub-fields to a single field. But unlike repeater fields where you create a single set of sub-fields, the flexible content field lets you create unlimited sub-field groups.
It’s a little bit hard to grasp at first – but once you understand how it works, the flexible content field gives you a ton of power. Essentially, it lets you create different “layout” sections that you can use as needed to build out your content field on a per-post basis.
You could use it to create an entirely customized template.
In the Advanced Custom Fields interface, you can add different layouts. Each layout consists of its own sub-fields:
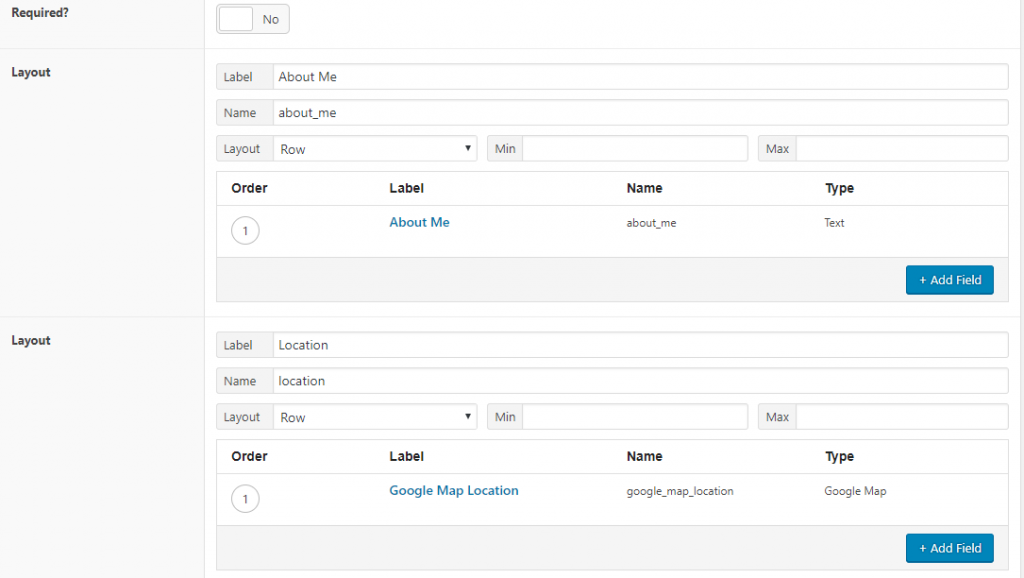
Then, you can mix and match those different layouts in the edit screen:

You can use it like a lightweight page builder to build entirely custom layouts for each page.
As with repeater fields, you’ll need different PHP functions to implement flexible content fields.
10 Helpful Plugins That Work Well With Advanced Custom Fields
In addition to Advanced Custom Fields Pro, there are also tons of third-party plugins that support Advanced Custom Fields. We’ll list some of our favorites below; additionally, Awesome ACF has a big collection of third-party plugins and resources.
1. Media Library Folders Pro
Media Library Folders Pro is a plugin that adds real folders to the WordPress Media Library. It includes support for Advanced Custom Fields so that users can use folders to manage files for the custom fields that you create.
With Media Library Folders Pro activated, users can benefit from real media folders whenever they insert or upload any content using the WordPress Media Library.
For example, here’s what it looks like in action with an Image custom field:
Media Library Folders Pro will work with any custom fields that use the WordPress Media Library, including repeater fields that you create with Advanced Custom Fields Pro.
If you’re a developer building sites for clients, this approach makes it much easier for non-technical users to manage their media files. And even if you’re working on your own site, you’ll still be able to benefit from improved organization.
2. Yoast SEO w/ Extension
Yoast SEO is the world’s most popular SEO plugin. But by default, it can’t perform its SEO and content analysis on custom fields.
With the ACF Content Analysis for Yoast SEO extension, you can change that for free. When activated, Yoast SEO will analyze all Advanced Custom Fields fields, including repeater fields.
3. Advanced Custom Fields: Font Awesome Field
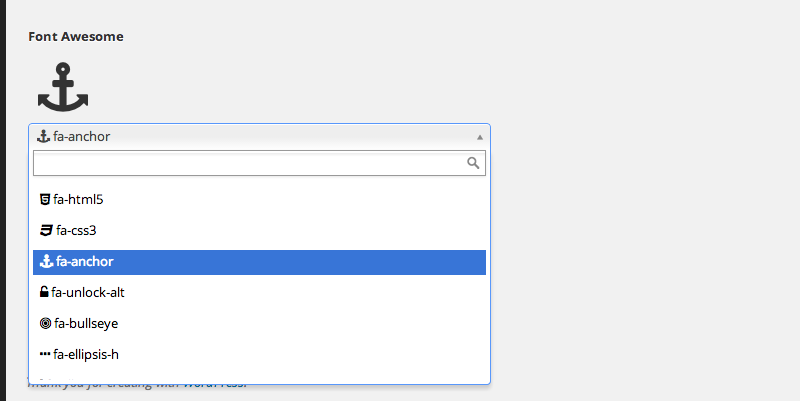
This free plugin adds a new Font Awesome field type so that you, or your users, can easily insert Font Awesome icons via a custom field.
Matt Keys created this solution for a theme he was developing to make it easy for users to add social media icons to their sites. Even though he never actually released the theme, the plugin became so popular that Matt continues to maintain it.
In Matt’s own words, “The funny thing is that I never ended up finishing and releasing the theme I created this plugin for, but the plugin has grown to such a popularity in the ACF community that I still maintain and update the plugin despite not actually having it in place on any production sites of my own.”
4. ACF qTranslate
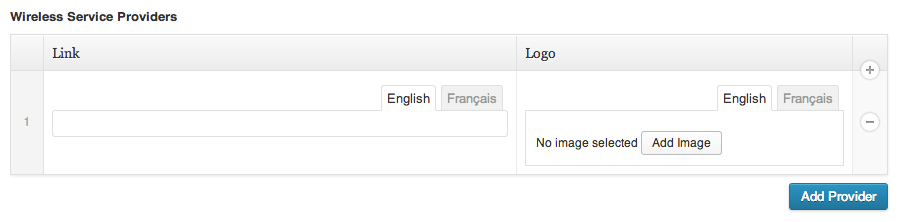
If you’re using qTranslate to create a multilingual WordPress site, this free plugin lets you add qTranslate compatible field types for:
- Text
- WYSIWYG
- Image
- File
5. Advanced Custom Fields: Image Crop Add-on
As you can probably guess from the name, this plugin lets you add a new Image with user-crop field type whereby users can crop images right in the custom field.
Anders Thorborg developed the plugin to overcome the negative results of auto-cropping. By allowing clients to easily crop images to pre-defined dimensions, he was able to give them a better experience. You can do the same with his plugin!
6. ACF: Better Search

This simple plugin adds WordPress search support for certain custom fields that you specify in the plugin’s interface.
7. ACF: TablePress
If you create tables with TablePress, you’ll love this free plugin that lets you add a custom field type to select tables that you’ve built with TablePress.
8. Admin Columns
While not specific to Advanced Custom Fields, the Admin Columns lets you add columns to the various administration screens in your WordPress dashboard, which can help you better organize the custom fields that you create with Advanced Custom Fields.
The Pro version of the plugin has a special integration with Advanced Custom Fields to ensure things go smoothly. In the words of David at AdminColumns, their “aim was to make the experience as seamless as possible.” Given its popularity in the Advanced Custom Fields community, it’s clear that the Admin Columns team succeeded.
9. ACF to REST API
This one is for developers only – it exposes Advanced Custom Fields endpoints in the WordPress REST API.
The plugin started after a friend of Aires, the developer, needed to integrate Advanced Custom Fields with the REST API. Aires “was on vacation and alone in a hotel room on a rainy day, so he took his notebook and started writing the plugin.”
The plugin that was spawned from a rainy day is now used by over 10,000 sites.
10. ACF Theme Code for Advanced Custom Fields
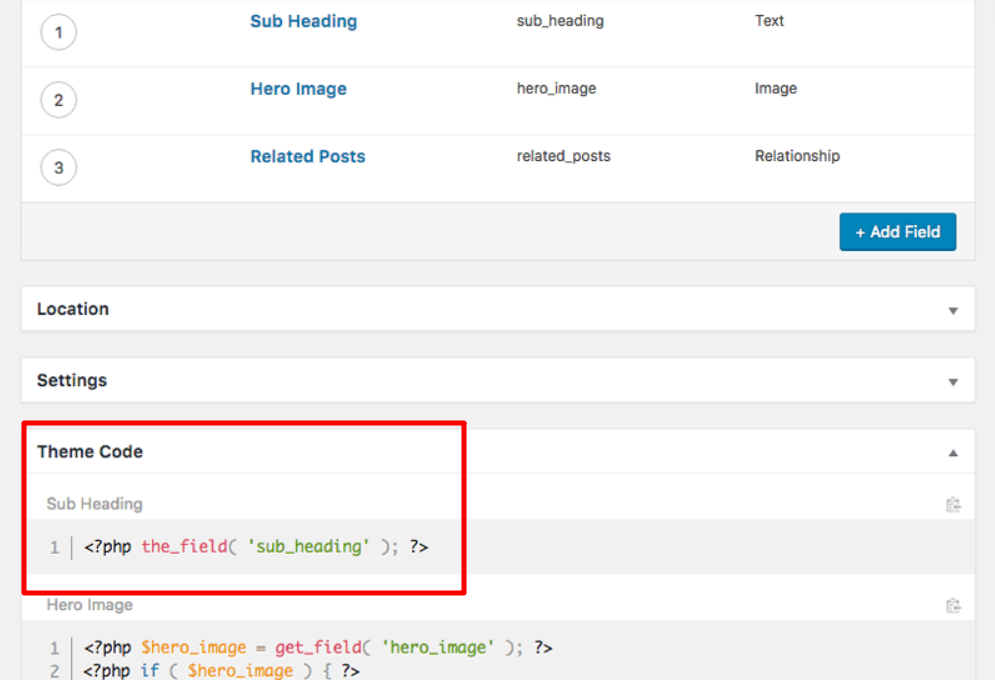
This free plugin makes it even simpler to display your custom fields by adding the actual code snippet for each custom field in the Field Group interface. All you need to do is paste the code snippet from the interface into your theme’s template files!
FAQ/Common Problems With Advanced Custom Fields
Below are some common questions/problems you might run into when using Advanced Custom Fields:
Why Don’t I See Advanced Custom Fields On The Live Version Of My Site?
Did you remember to add the PHP function to your theme’s template files? If so, did you use the right field name?
Why Can’t People Search My Custom Fields?
If you’re using custom fields to add large chunks of content, you might run into usability issues if those fields aren’t searchable. You can either use the ACF: Better Search plugin or check out this thread for some tips on using Relevanssi with Advanced Custom Fields.
Can I Let Users Submit Custom Fields On The Front-end?
Yup! This is one of the cooler, and more advanced, implementations of Advanced Custom Fields. Look into this documentation article if you’re interested.
Wrapping Things Up
Advanced Custom Fields makes it easy to extend your WordPress content in a ton of different ways. Once you grasp how to create and display fields on the front-end of your site, you’re almost there! There are still more advanced tweaks, like creating front-end submission forms – but you should already be able to do some cool things just by following this article.
We hope you enjoyed learning about Advanced Custom Fields and we look forward to seeing what you come up with!