The Media Library Folders Pro S3 Addon extends Media Library Folders Pro’s regular functionality by allowing you to copy or move your files to and from Amazon S3 while preserving the same custom folder structure that you see in the Media Library Folders Pro interface.
Beyond that, you can also automatically change links in posts or pages to use files on S3 instead of your local server. And you can also manually upload or download individual files to/from S3 via the Media Library Folders Pro interface.
In this article, we’ll show you how to get up and running with the Media Library Folders Pro S3 Addon.
In a nutshell, you’ll need to:
- Create a new bucket at Amazon S3
- Create a new IAM user and assign it the proper permissions
- Add your IAM user’s access keys in your wp-config.php file
- Configure the Media Library Folders Pro S3 Addon settings
Below, we’ll go through the entire process step-by-step to help you get started.
What You’ll Need To Get Started
In order to start using the Media Library Folders Pro for WordPress S3 Addon, here’s what you’ll need:
- Media Library Folders Pro installed and activated on your WordPress site.
- Media Library Folders Pro for WordPress S3 Addon installed and activated on your site.
- An Amazon AWS account. If you don’t already have one, you can sign up for free here.
- Access to your site’s wp-config.php file either via FTP, cPanel File Manager, or another method.
Once you have those four things, you’re ready to jump into the tutorial.
How To Configure Media Library Folders Pro S3 Addon
Step 0: Back Up Your Database And Uploads Folder
Before performing any other steps on this list, we highly recommend that you back up your site.
Once you have a recent backup in hand, you can continue to start setting up Amazon S3 on your WordPress site.
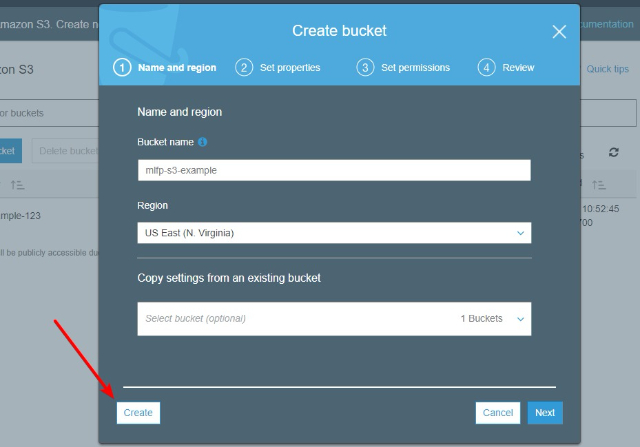
Step 1: Create A New Bucket At Amazon S3
To get started, we recommend that you create a new S3 bucket to use with the Media Library Folders Pro for WordPress S3 Addon.
To do that, go to Amazon S3 by clicking this link or logging in directly.
Then:
- Click the + Create bucket button

- Enter the basic details for your bucket and click Create
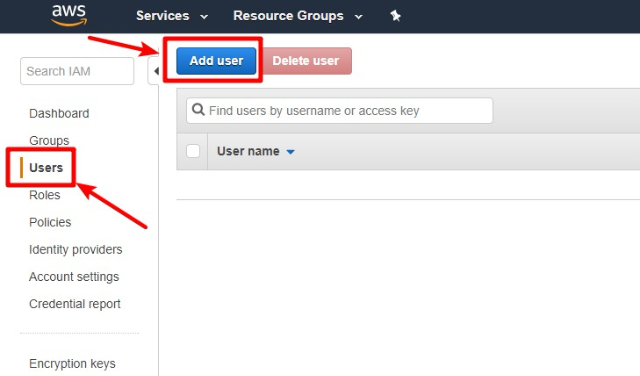
Step 2: Create A New IAM User At AWS
Next, you’ll need to create a new IAM user at your AWS account. IAM stands for Identity and Access Management.
Essentially, you’re creating a user profile for the Media Library Folders Pro for WordPress S3 Addon to connect to your Amazon S3 account. You’ll then use these credentials to configure the plugin in later steps.
To get started, go to the IAM service by clicking here or logging in directly.
Then:
- Click on the Users tab
- Click Add user
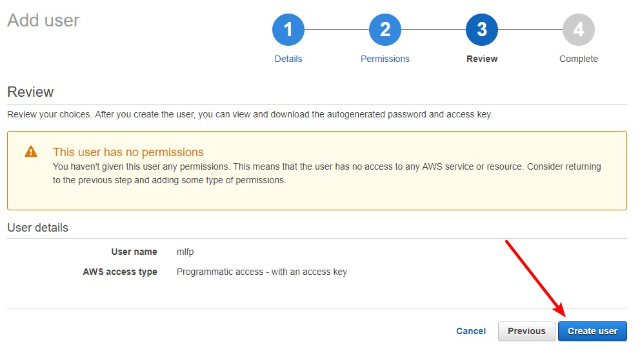
In the Add user interface:
- Give the user a username. The actual username isn’t important – it can be anything.
- Select Programmatic access under Access type
- Click Next: Permissions
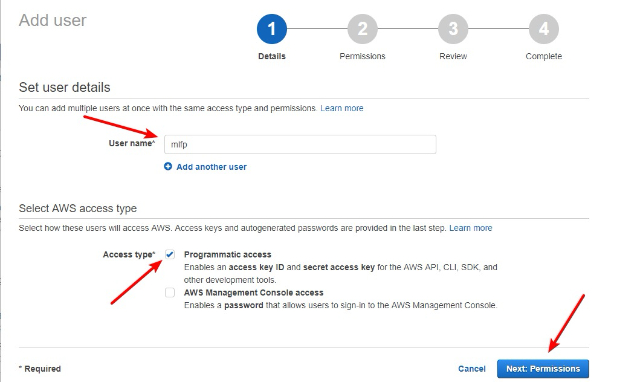
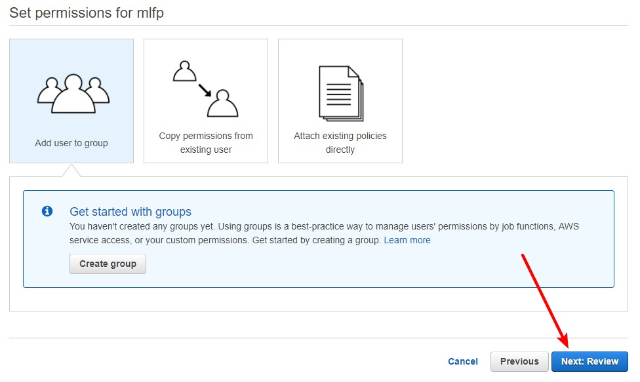
- Click Next: Review (you do not need to configure any permissions right now – we’ll cover this later on)
- On the Review page, click Create user to finish the process
Leave the Complete page open because you’ll need the Access key ID and Secret access key for the next step.
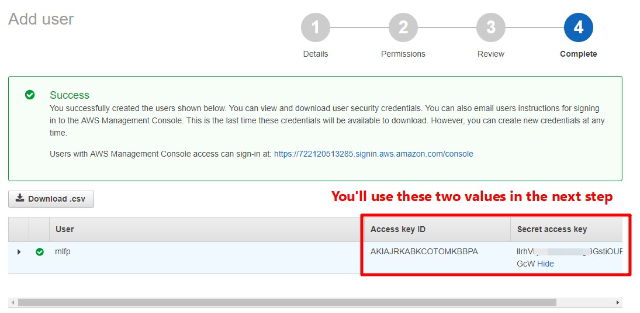
Step 3: Add Access key ID and Secret access key to wp-config.php File
Next, you need to edit your WordPress site’s wp-config.php file. You can do this by connecting to your site via FTP and looking for wp-config.php in the root folder of your site. Or, if your host uses cPanel, you can use cPanel’s File Manager tool.
Once you have access to your wp-config.php file, add these two lines of code before the /* That's all, stop editing! Happy blogging. */ line:
define('MF_AWS_ACCESS_KEY_ID', 'Your_Access_Key_ID');
 define( 'MF_AWS_SECRET_ACCESS_KEY', 'Your_Secret_Access_Key');
Replace the Your_Access_Key_ID and Your_Secret_Access_Key placeholders with the actual values from the previous step.
For example, here’s what the final product looks like on our test site:

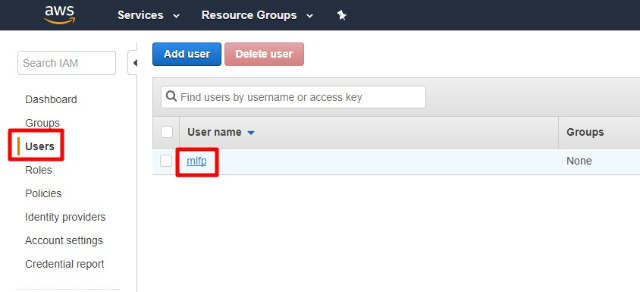
Step 4: Set IAM User Permissions
Next, go back to the IAM interface in your AWS console to set up permissions for your IAM user.
- Click on the Users tab
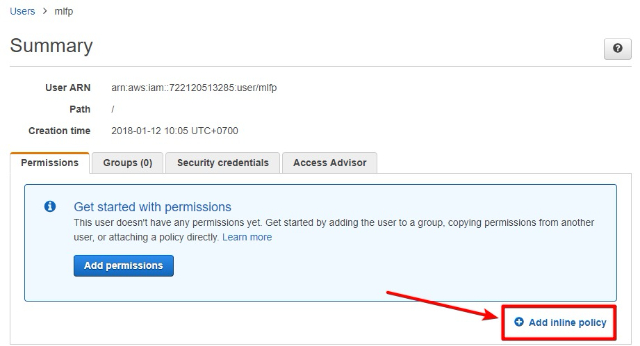
- Select the user you created in Step 2
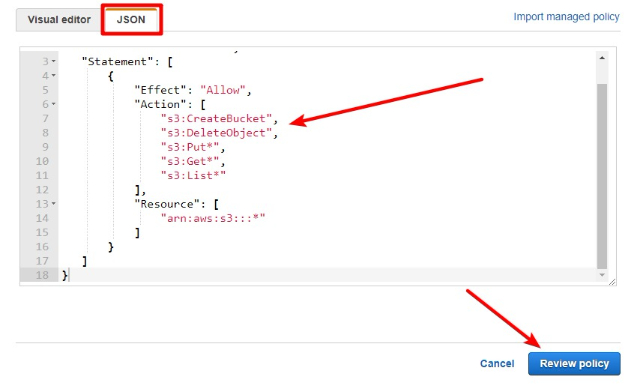
- In the Permissions tab, click the link to Add inline policy
- Click on the JSON tab and paste in the following code snippet
{
 "Version": "2012-10-17",
 "Statement": [
 {
 "Effect": "Allow",
 "Action": [
 "s3:CreateBucket",
 "s3:DeleteObject",
 "s3:Put*",
 "s3:Get*",
 "s3:List*"
 ],
 "Resource": [
 "arn:aws:s3:::*"
 ]
 }
 ]
 }
- Click Review policy
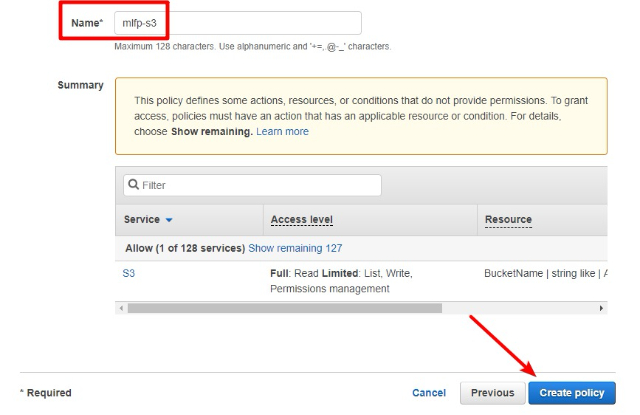
- Give your policy a Name
- Click Create policy
Step 5: Select Bucket In Media Library Folders Pro S3 Interface
Once you’ve added IAM user permissions, go to your WordPress dashboard access the Media Library Folders Pro S3 interface at Media Library Folders Pro → S3 Settings.
There:
- Click the Select S3 Bucket button to expand a list of possible buckets
- Select the bucket that you created in Step 1
- Enter the region for your bucket (this is available in the S3 interface if you’re not sure)
- Click Save Bucket Selection
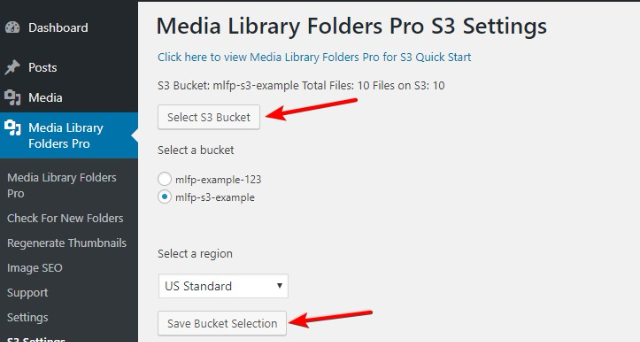
Now, your WordPress site will be connected to your S3 bucket and you’ll be able to complete further actions using the additional options in this interface.
How To Use Media Library Folders Pro S3 Addon
Once you’ve finished the configuration process, you should see a new set of options in the S3 Settings interface:
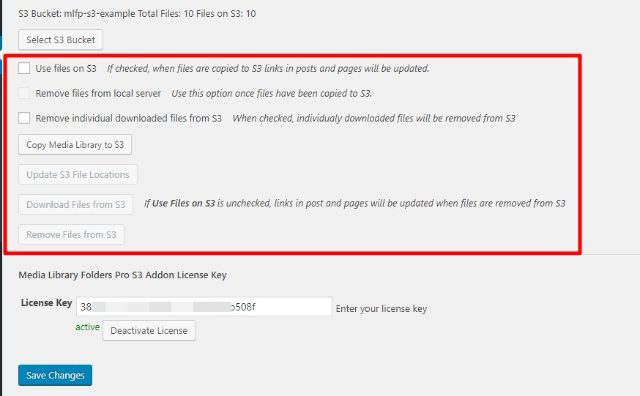
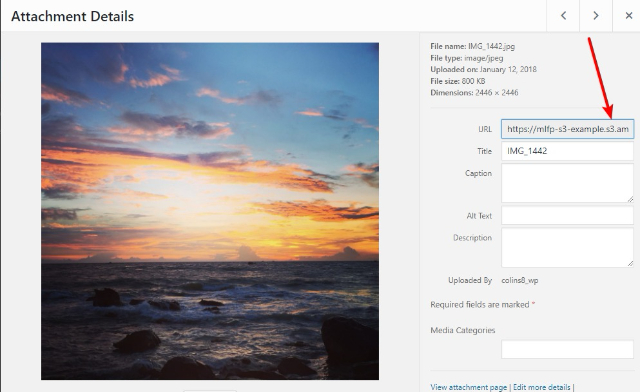
- Use files on S3 – when this option is checked, the plugin will automatically update links in posts and pages to point to the version of the file on S3, rather than the version on your local server. For example, you can see that the image link below now points to S3 instead of the local server:
- Remove files from local server – when this option is checked, the plugin will remove the local version of the file after copying it to S3.
- Remove individual downloaded files from S3 – when this option is checked, individual files that you download via the regular Media Library Folders Pro interface will be removed from S3. More on how to do this in a second.
- Copy Media Library to S3 – click this button to copy all of the files in your Media Library to S3.
- Update S3 File Locations – click this button to manually update S3 file locations.
- Download Files from S3 – click this button to download all of the files from your S3 bucket to your local server. You can also download individual files from the Media Library Folders Pro interface. More on how to do this in a second.
- Remove Files from S3 – click this button to remove all of the files from your S3 bucket.
Using Media Library Folders Pro S3 Addon For Individual Files
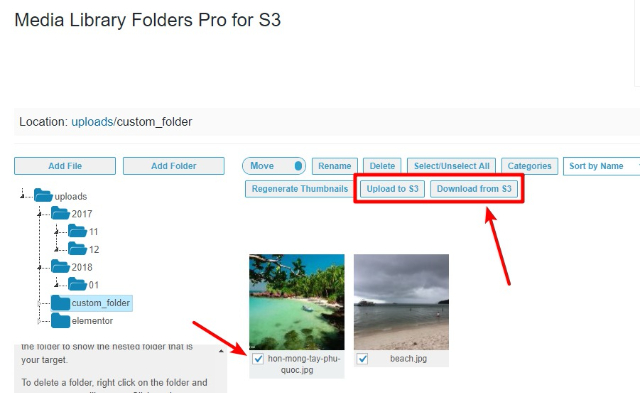
Beyond the functionality outlined above, the Media Library Folders Pro S3 Addon also gives you new options in the regular Media Library Folders Pro interface. These options let you:
- Upload one or more files to S3
- Download one or more files from S3
To perform both actions:
- Select one or more files in the Media Library Folders Pro interface
- Click on Upload to S3 or Download from S3, respectively
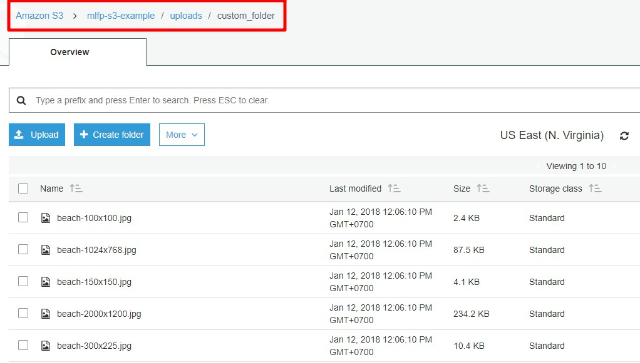
When you upload or copy files to S3, they will maintain the same folder structure as you’ve set up in Media Library Folders Pro:
If you need more help on how to use the core Media Library Folders Pro plugin, please consult this article.