Want to use a CDN to speed up global delivery of the files you store at DigitalOcean Spaces?
The Media Library Folders Pro S3 add-on lets you offload your WordPress media files to DigitalOcean Spaces and then serve those files up directly from Spaces.
But while serving files directly from DigitalOcean Spaces works fine at a basic level, you can achieve lower latency and faster download times for visitors around the globe by serving the files you store at Spaces via a CDN instead.
Depending on which CDN you choose, you might also end up saving on bandwidth costs, as well.
To help you get set up, we’re going to show you how to connect your DigitalOcean Spaces object storage to 2 popular CDNs:
Beyond that, the same principles that we show you in these two tutorials should apply to almost any origin pull CDN*.
While we will focus on how to do this on WordPress using our Media Library Folders Pro S3 add-on, the basic principles that we’ll cover will also apply to any type of site. So even if you’re not using WordPress, this guide should still help you out.
*While we showed you how to connect Cloudflare to an Amazon S3 bucket in another tutorial using the free Cloudflare plan, the only way to connect Cloudflare to DigitalOcean Spaces is if you have a paid plan that supports host header rewrites.
Here’s What You Need To Get This Working
To get started, we’re going to assume that you’ve already managed to connect your WordPress site to DigitalOcean Spaces.
If you haven’t already, you’ll need our Media Library Folders Pro plugin and the Media Library Folders Pro S3 add-on.
Once you have those two plugins, you can follow this guide to connect WordPress to DigitalOcean Spaces.
Once you’ve connected your WordPress site to DigitalOcean Spaces, make sure that you do not check the box to Use files on the cloud server:
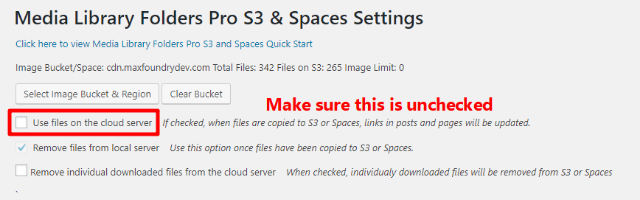
This is essential because you’ll use a separate plugin to rewrite the URLs on your site to use your CDN. Even with this box unchecked, Media Library Folders Pro S3 will continue to offload your WordPress media files to DigitalOcean Spaces.
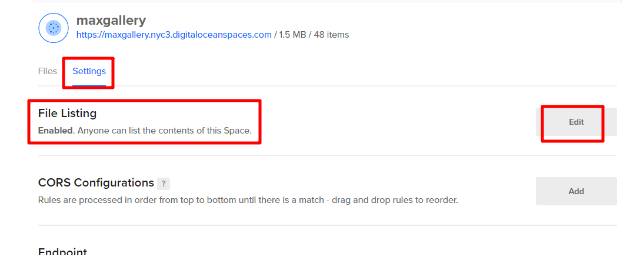
Additionally, make sure that your Space has File Listing enabled. You can choose this setting when you create your Space. And you can also edit it at a later date by going to Settings → File Listing in an existing Space:
Once you’re ready to get started, you can click below to jump straight to the specific CDN that you want to use:
How To Connect KeyCDN To DigitalOcean Spaces And WordPress
To get started, go to your KeyCDN dashboard (if you haven’t already signed up for KeyCDN, you can do that here).
Once you’re in your dashboard, here’s how to get set up…
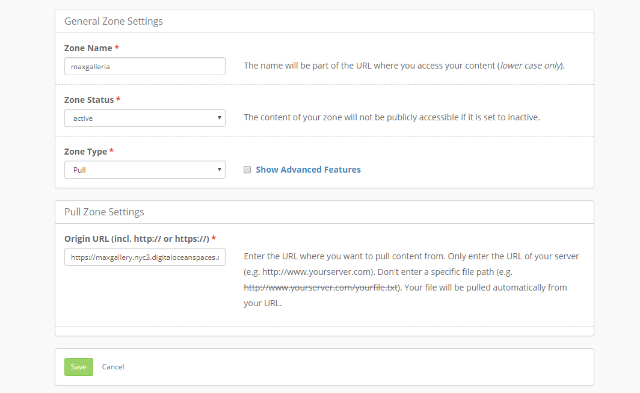
Step 1: Create A New Pull Zone In KeyCDN
To get started, go to the Zones tab in your KeyCDN dashboard and create a new zone. Give it a Zone Name (this will be part of the URL where you access your content, if you don’t use an alias).
Then make sure the Zone Type is set to Pull.
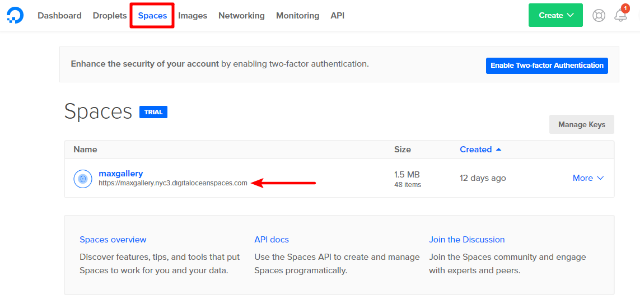
In the Pull Zone Settings area, enter the URL to your DigitalOcean Space:
If you’re not sure what this URL is, you can find it in the Spaces tab of your DigitalOcean dashboard:
Then, click Save.
You’ll need to wait several minutes while KeyCDN deploys your zone:
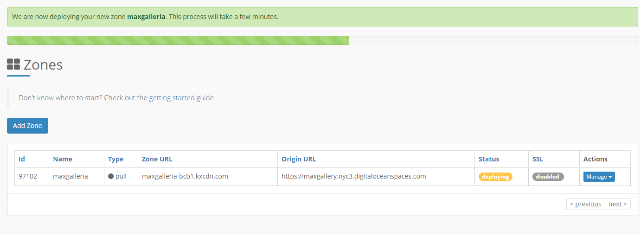
But once that process finishes, you’re almost ready to start using your CDN on your live site.
Step 2: Rewrite WordPress URLs To Use KeyCDN
Once your zone is deployed, all you need to do is rewrite the URLs on your WordPress site to use your CDN rather than the files on your server or DigitalOcean Spaces.
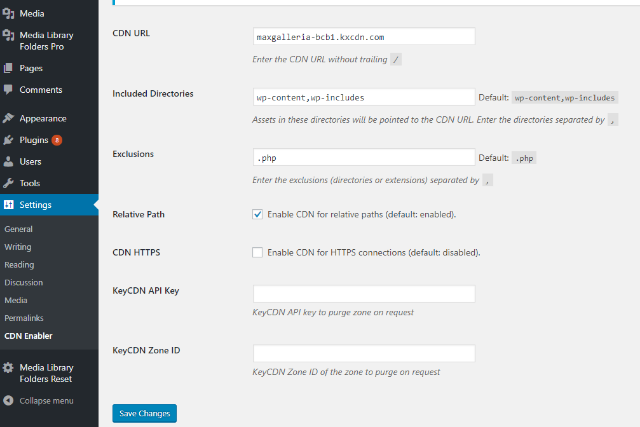
To do that, you can use the free CDN Enabler plugin. Once you’ve installed and activated the plugin, go to Settings → CDN Enabler in your WordPress dashboard.
Add your CDN URL. You can also configure the other settings if needed, but the defaults should be fine for most uses:
To find your CDN URL, go to the Zones tab in your KeyCDN dashboard and look for the Zone URL:

And that’s it! Your WordPress site should now start serving files from DigitalOcean Spaces via KeyCDN.
How To Connect StackPath CDN To DigitalOcean Spaces And WordPress
StackPath, the company that acquired the once-popular MaxCDN, is another CDN that’s easy to integrate with DigitalOcean Spaces.
The process for connecting DigitalOcean Spaces to StackPath is nearly identical to KeyCDN, with just a few interface tweaks.
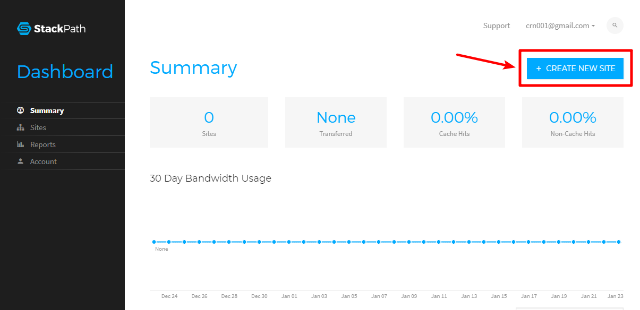
Step 1: Create A New Site In StackPath
To start the process, go to your StackPath dashboard and click the button to Create New Site:
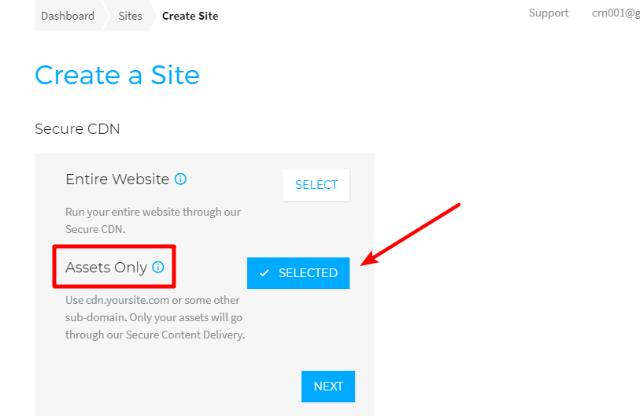
On the next screen, select the option for Assets Only and click Next:
Next, you’ll need to enter your:
- Name – this will be part of your CDN URL, unless you use an alias.
- Original Server URL – this is the URL to your DigitalOcean Space*.
- Label – this is purely internal.
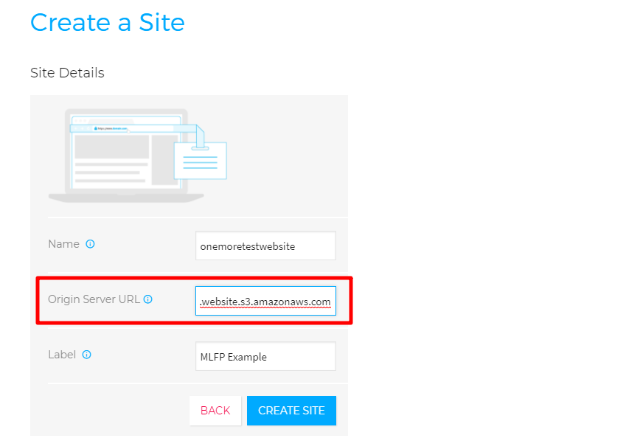
Then click Create Site.
*You can find the URL to your Space in the Spaces tab of your DigitalOcean dashboard:
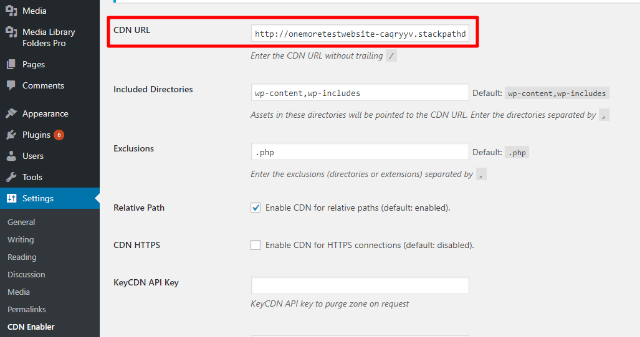
Step 2: Rewrite WordPress URLs To Use StackPath
Just like with the KeyCDN example, you’ll need to finish up by rewriting the URLs on your WordPress site to use StackPath.
To do that, install and activate the free CDN Enabler plugin. Then, go to Settings → CDN Enabler in your WordPress dashboard and enter your StackPath CDN URL in the CDN URL box:
This Process Should Work For Other CDNs As Well
The same process that we outlined above should work to connect DigitalOcean Spaces to most other CDNs, as well (with the notable exception of Cloudflare, as previously mentioned).
For any origin pull CDN, you should essentially be able to just paste in your DigitalOcean Space as the origin URL. Then, all you need to do is rewrite the URLs on your WordPress site using a plugin like CDN Enabler.
And if you’re still looking for a way to offload your WordPress media files to DigitalOcean Spaces, check out how Media Library Folders Pro and Media Library Folders Pro S3 can help you manage your media library’s folder structure and automatically offload your files to DigitalOcean Spaces.