Need to connect an Amazon S3 bucket to a CDN?
As part of our Media Library Folders Pro S3 WordPress plugin, we recognized a need for webmasters to use a CDN with Amazon S3.
To help, we’ve written tutorials for four popular CDNs:
And we’ll also explain some of the benefits of connecting S3 to a CDN, in case you’re not already convinced.
By the end of this post, you’ll not only know how to use a CDN with your S3 bucket, but also how to connect all of that back to WordPress!
Read This If You’re Not Already Familiar With Amazon S3
We’ll keep this brief because this post is more focused on the how than the what. But here’s a quick primer in case you’re not familiar with Amazon S3 and how it applies to WordPress.
Amazon S3 is an object storage service that provides a reliable, affordable place for you to store your site’s files. In simpler terms, it lets you store your site’s files in the cloud.
For WordPress sites, Amazon S3 is most commonly used to store files uploaded through the WordPress Media Library. That is, your:
- Images
- Videos
- PDF documents
- Etc.
Why would you want to use Amazon S3 instead of your own web server? For a few reasons:
- Affordability – if you need to store large amounts of data, Amazon S3 will often come out cheaper than your host.
- Reduced requests to server – because your web server no longer needs to handle media files, it can focus all its efforts on processing PHP (which lets it serve up WordPress content faster)
- Detached media – while not a huge issue, this lets you migrate a site with lots of files more quickly because your bulky media files are detached from your hosting server.
Here’s Why You Should Connect Amazon S3 To A CDN
If you read the previous section – you know that Amazon S3 is an object storage service. That means, while you certainly can serve up content right from Amazon S3, Amazon S3 isn’t necessarily built to serve that content up quickly.
Unlike Amazon S3, a CDN, short for content delivery network, is focused on delivering your assets as quickly as possible, rather than just affordably storing them.
By connecting Amazon S3 to a CDN, you essentially get the best of both worlds. That is, you still get to take advantage of Amazon S3’s cheap storage, reduced server requests, and detached media, but you can also get the benefits of a CDN:
- Lower latency and faster download times
- Multiple global data centers instead of a single region (like with Amazon S3)
- Potentially cheaper bandwidth costs, depending on which CDN service you choose
Before Getting Started: How To Connect WordPress To Amazon S3
This post isn’t specifically focused on how to connect WordPress to Amazon S3, so we’re not going to cover this part in great detail.
But before you can connect Amazon S3 to a CDN, you need a way to actually get your files from WordPress to Amazon S3. Makes sense, right?
To do that, you have a couple options:
- Media Library Folders Pro S3 – lets you manage your WordPress media library using actual folders, as well as offload those folders to Amazon S3, while preserving the same folder structure.
- A custom plugin – Smashing Magazine has a good tutorial on how to do this, though it’s not for the faint of heart (that is – you need to know some code).
You’ll also need to ensure that your S3 bucket is public. If you’re not sure how to make your S3 bucket public, this help article outlines the bucket policy that you’ll need to use.
Once you’ve connected your WordPress site to a public S3 bucket, you can click below to jump straight to how to connect Amazon S3 to your desired CDN:
How To Connect Cloudflare CDN To Amazon S3 And WordPress
Cloudflare is a popular free CDN and DNS service.
For this section, we’ll assume that you’ve already set up and configured the basic Cloudflare service. If you haven’t, you can sign up for Cloudflare here and follow this tutorial to configure Cloudflare with your website.
Beyond having Cloudflare configured, you also need to make sure that your bucket is public and your bucket’s name is the same as the CNAME that you want to use for your files. You can read more about this at the S3 support docs.
Here’s an example:
- Our demo site is
onemoretest.website - We want images to load from
cdn.onemoretest.website
To make things work with Cloudflare, we named our bucket:
cdn.onemoretest.website
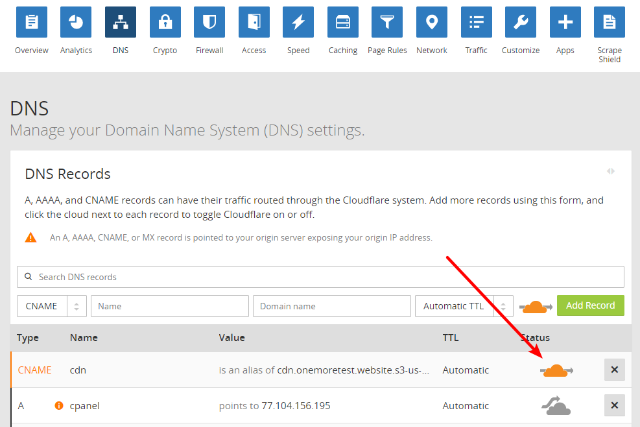
Step 1: Add New CNAME Record To Cloudflare
To get started, go to your Cloudflare account. Then:
- Click on the DNS tab
- Add a new CNAME record for your S3 bucket endpoint URL
To find your bucket’s endpoint URL:
- Start with your bucket name
- End with .s3.amazonaws.com
For reference, the URL to our example bucket is:
http://cdn.onemoretest.website.s3.amazonaws.com
For our example, that means:
- Choose CNAME as the Type
- Put “cdn” in the Name
- Put the URL for your S3 bucket in the Domain name
- Leave the default Automatic TTL

Once you create the CNAME record, you should see the orange icon that indicates Cloudflare is forwarding the traffic:
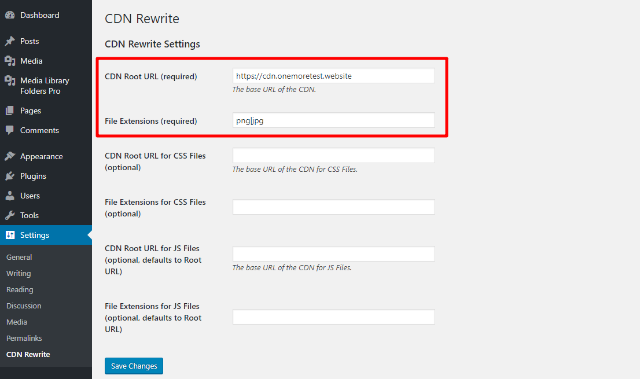
Step 2: Rewrite WordPress URLs To Use Cloudflare CDN
Next, you’ll need to rewrite the URLs on your WordPress site to use the cdn alias you just set up.
To do that, you can use the free WP CDN Rewrite plugin.
Once you install and activate the plugin, go to Settings → CDN Rewrite and configure the plugin for the file extensions that you want to automatically rewrite URLs for:
How To Connect Amazon CloudFront CDN To Amazon S3 And WordPress
CloudFront is Amazon’s own CDN service that you can easily integrate with S3 to serve your files.
As with Cloudflare, we’ll assume that you’ve already properly set up your S3 bucket.
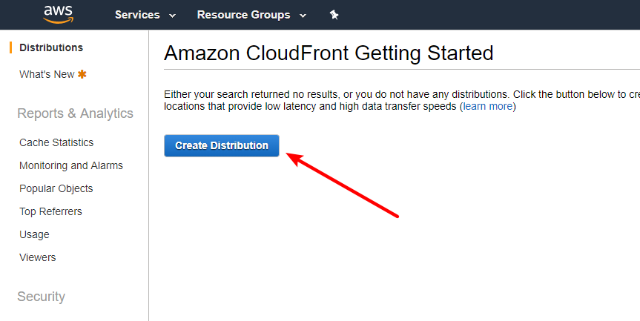
Once you’ve done that, go to the CloudFront area in your AWS console to get started.
Step 1: Create A New Distribution
To start setting up CloudFront:
- Click Create Distribution
- Click Get Started under the Web section (not RTMP)
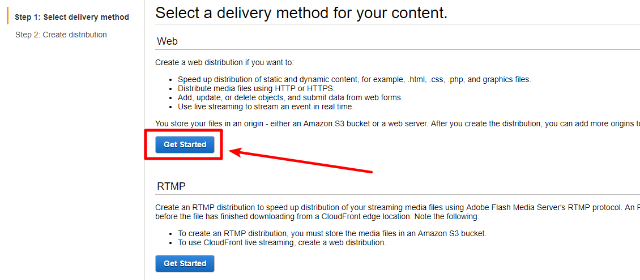
- Click on the Origin Domain Name and choose your S3 bucket from the list that appears
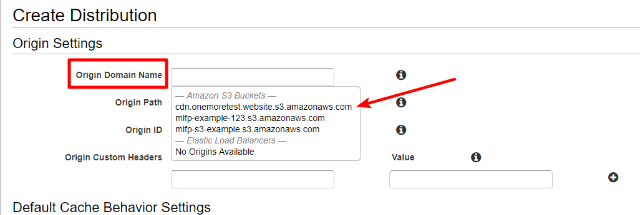
Once you select your S3 bucket, CloudFront should populate all the other information by itself.
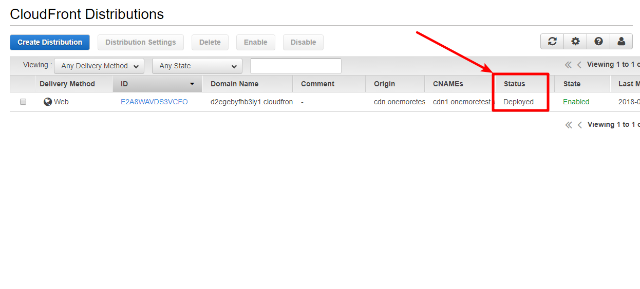
All you need to do is scroll to the bottom and click Create Distribution.
Once your Distribution’s status changes from In Progress to Deployed, you can either:
- Start serving files on your WordPress site from the CDN right away in the next step
- Follow these instructions to set up an alternate domain name before you proceed to the next step
Step 2: Rewrite WordPress URLs To Use CloudFront CDN
Once you’re happy with the URL that you’re using for your CloudFront distribution, you need to rewrite the URLs on your WordPress site to match it.
To do that, you can use the free WP CDN Rewrite plugin.
Once you install and activate it, go to Settings → CDN Rewrite and configure the plugin for the file extensions that you want to automatically rewrite URLs for:

Now, your WordPress site should start automatically serving images from S3 and CloudFront.
How To Connect Stackpath To Amazon S3 And WordPress
To connect Stackpath to S3 and your WordPress site, you’ll first need to create a new Stackpath site using your S3 bucket as the origin server.
Then, you can use the free WP CDN Rewrite plugin to rewrite the URLs on your WordPress site to pull images from Stackpath.
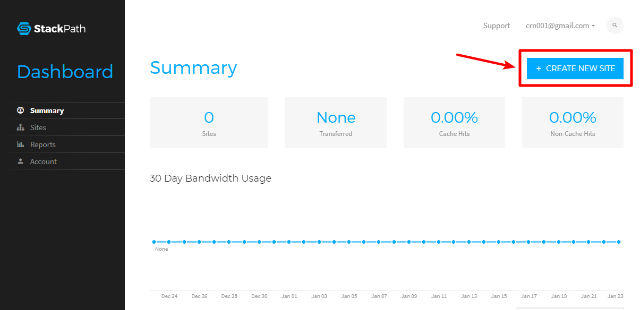
Step 1: Create A New Site In Stackpath
To get started, go to your Stackpath dashboard and click the button to CREATE NEW SITE:
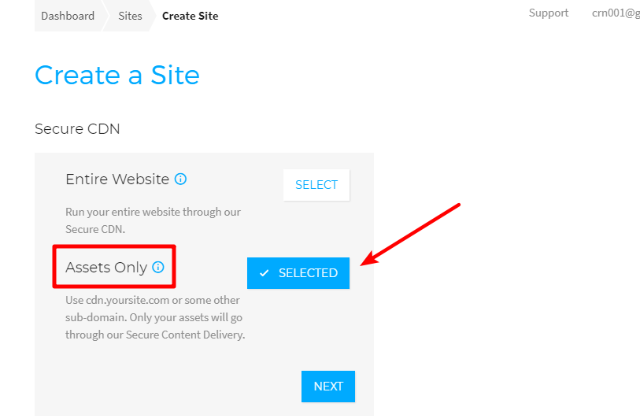
On the next page, choose the option for Assets Only and click NEXT:
On the next screen, enter a Name and Label.
The Name will be part of your CDN URL, while the Label is purely internal.
In the Origin Server URL, enter the URL to your bucket. Your S3 bucket URL looks like this:
http(s)://<bucket>.s3.amazonaws.com/
For example, our test bucket has these details:
- Bucket name:
cdn.onemoretest.website - Bucket URL:
http://cdn.onemoretest.website.s3.amazonaws.com
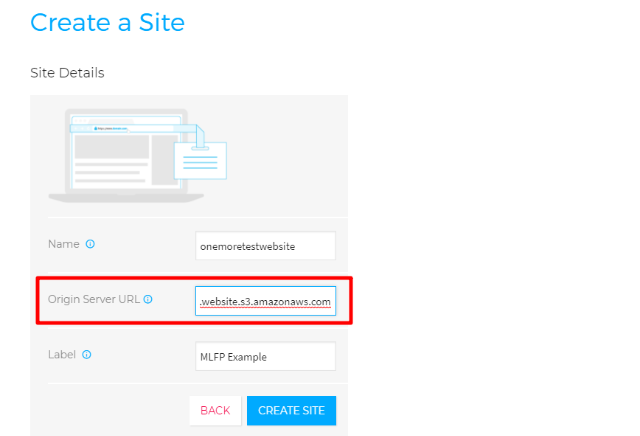
Then click the button to CREATE SITE.
Step 2: (Optional) Set Up CNAME For Stackpath
If you’d prefer to serve images from your own subdomain like:
cdn.onemoretest.website
Rather than something like:
http://onemoretestwebsite-caqryyv.stackpathdns.com
You can configure this from the Stackpath settings page:
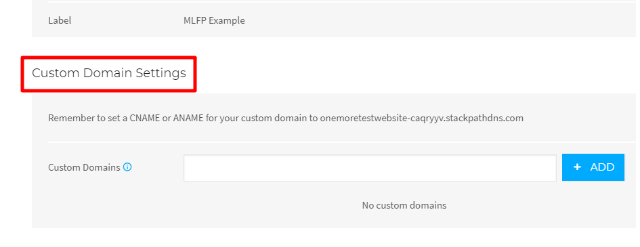
Otherwise, you’re ready to move on.
Step 3: Rewrite WordPress URLs To Use Stackpath
To finish the process, you need to rewrite the media URLs on your WordPress site to use your CDN.
To do that, you can use the free WP CDN Rewrite plugin.
Once you’ve installed and activated the plugin, go to Settings → CDN Rewrite and enter the URL to your Stackpath site:
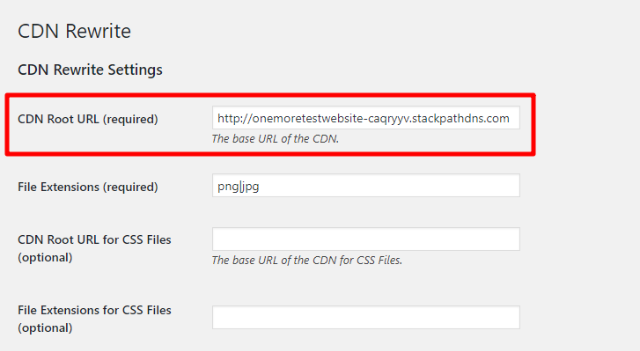
Once you save your changes, your site should start automatically serving media files from Stackpath.
How To Connect KeyCDN To Amazon S3 And WordPress
To connect KeyCDN to Amazon S3 and WordPress, you’ll first need to create a new pull zone in KeyCDN using your S3 bucket endpoint URL.
Then, you’ll need to rewrite the URLs on your WordPress site to use KeyCDN.
Step 1: Create New Pull Zone At KeyCDN
Go to your KeyCDN dashboard, click on the Zones tab, and enter the following information:
- Zone Name – this is part of the URL where you access your content, unless you use a CNAME
- Zone Status – make sure this is active so your zone is publicly accessible
- Zone Type – make sure this is set to the default “pull” option
- Origin URL – enter the URL to your Amazon S3 bucket endpoint
To find the URL to your S3 bucket, follow this format:
http(s)://<bucket>.s3.amazonaws.com/
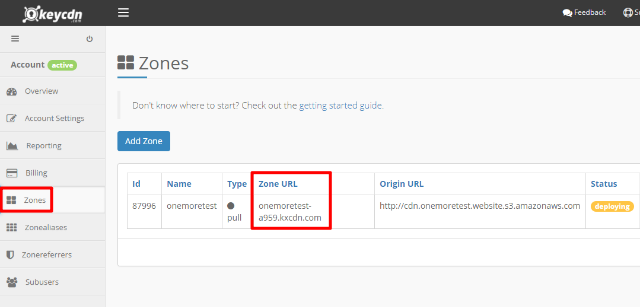
For example, the bucket URL for our example site is http://cdn.onemoretest.website.s3.amazonaws.com

Then, click Save.
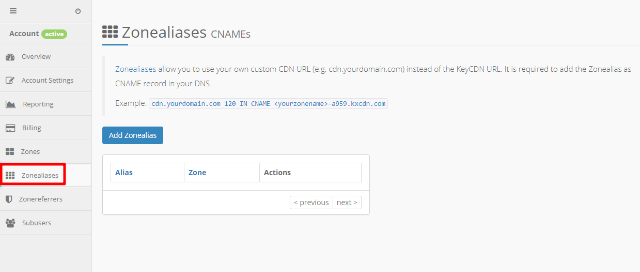
Step 2: (Optional) Set Up CNAME For KeyCDN
Optional – If you’d prefer to use your own custom CDN URL like cdn.yourwebsite.com instead of the generic KeyCDN URL, you can set up something called a Zonealias by going to the Zonealiases tab and then adding the CNAME record to your DNS:
Step 3: Rewrite WordPress URLs To Use KeyCDN
Once you’ve created your pull zone, you need to rewrite the URLs on your WordPress site to use either the KeyCDN URL or, if you set up a Zonealias, the Zonealias URL.
You can find the KeyCDN URL in the Zones tab:
To do that, you can use the free WP CDN Rewrite plugin.
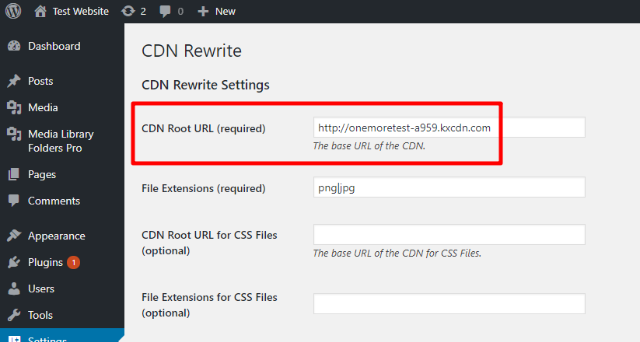
Once you’ve installed and activated the plugin, go to Settings → CDN Rewrite in your WordPress dashboard and enter the URL in the CDN Root URL box:
Once you save your changes, your site should start automatically serving the relevant media files from KeyCDN.
Connect S3 To A CDN For The Best Of Both Worlds
By connecting Amazon S3 to a CDN, you get affordable data warehousing via S3, while still getting lightning fast load times thanks to the CDN.
And once you find a way to get your files onto Amazon S3, it’s fairly easy to get S3 working with your CDN of choice.
Finally, if you’re running on WordPress and want an easy way to offload files to S3, while also gaining the ability to manage your media files with actual folders, Media Library Folders Pro S3 can help simplify the entire process.
Give it a look and see how it can make managing your media files easier!