mlfp_before_add_file
add_action(‘mlfp_before_add_file’, ‘process_before_add_file’, 10, 2);
Parameters
$new_filename – the name of the new file
$folder_id – the id of the destination folder
function process_before_add_file($new_filename, $folder_id) {
}
mlfp_process_new_file
add_action(‘mlfp_process_new_file’, ‘process_new_add_file’, 10, 2);
Parameters
$filename – the name of the file
$folder_id – the id of the parent folder
function process_new_add_file($filename, $folder_id) {
}
mlfp_after_add_file
add_action(‘mlfp_after_add_file’, ‘process_after_add_file’, 10, 2);
Parameters
$attach_id – the id of the attachment
$filename – the filename
$folder_id – the id of the parent folder
function process_after_add_file($attach_id, $filename, $folder_id) {
}
mlfp_before_folder_creation
add_action(‘mlfp_before_folder_creation’, ‘do_before_folder_creation’);
Parameters
$new_folder_path – path to new folder
$parent_folder_id – parent folder id
$new_folder_url – URL to the new folder
function do_before_folder_creation($new_folder_path, $parent_folder_id, $new_folder_url) {
}
mlfp_after_folder_creation
add_action(‘mlfp_after_folder_creation’, ‘do_after_folder_creation’);
Parameters
$new_folder_path – path to new folder
$parent_folder_id – parent folder id
$new_folder_url – URL to the new folder
function do_after_folder_creation($new_folder_path, $parent_folder_id, $new_folder_url) {
}
mlfp_before_file_move
add_action(‘mlfp_before_file_move’, ‘do_before_file_move’);
Parameters
$image_path – path to the image or file
$destination_name – path to the file in destination folder
function do_before_file_move($image_path, $destination_name) {
}
mlfp_after_file_move
add_action(‘mlfp_after_file_move’, ‘do_after_file_move’);
Parameters
$image_path – path to the image or file
$destination_name – path to the file in destination folder
$destination_url – new url of the image
function do_after_file_move($image_path, $destination_name, $destination_url) {
}
mlfp_before_file_copy
add_action(‘mlfp_before_file_copy’, ‘do_before_file_copy’);
Parameters
$image_path – path to the image or file
$destination_name – path to the file in destination folder
function do_before_file_copy($image_path, $destination_name) {
}
mlfp_after_file_copy
add_action(‘mlfp_after_file_copy’, ‘do_after_file_copy’);
Parameters
$image_path – path to the image or file
$destination_name – path to the file in destination folder
$destination_url – new URL of the file in the destination folder
$folder_id – new folder ID
function do_after_file_copy($image_path, $destination_name, $destination_url, $folder_id) {
}
mlfp_before_file_rename
add_action(‘mlfp_before_file_rename’, ‘do_before_file_rename’);
Parameters
$old_file_path – path to the old file name
$new_file_path – path to the new file name
function do_before_file_rename($old_file_path, $new_file_path) {
}
mlfp_after_file_rename
add_action(‘mlfp_after_file_rename’, ‘do_after_file_rename’);
Parameters
$old_file_path – path to the old file name
$new_file_path – path to the new file name
function do_after_file_rename(do_after_file_rename) {
}
mlfp_before_file_or_folder_delete
add_action(‘mlfp_before_file_or_folder_delete’, ‘do_before_file_or_folder_delete’);
Parameters
$delete_id – id of the file or folder to delete
$folder_path – path to the item to delete
$post_type (‘attachment’ or ‘mgmlp_media_folder’)
function do_before_file_or_folder_delete($delete_id, $folder_path, $post_type) {
}
mlfp_after_file_or_folder_delete
add_action(‘mlfp_after_file_or_folder_delete’, ‘do_after_file_or_folder_delete’);
Parameters
$old_file_path – path to the old file name
$new_file_path – path to the new file name
$post_type (‘attachment’ or ‘mgmlp_media_folder’)
function do_after_file_or_folder_delete($delete_id, $folder_path, $post_type) {
}
mlfp_before_folder_hide
add_action(‘mlfp_before_folder_hide’, ‘do_before_folder_hide’);
Parameters
$folder_id – ID of the folder to hide
$attached_file (relative path to the folder)
function do_before_folder_hide($folder_id, $attached_file) {
}
mlfp_after_folder_hide
add_action(‘mlfp_after_folder_hide’, ‘do_after_folder_hide’);
Parameters
$folder_id – ID of the folder to hide
$attached_file (relative path to the folder)
function do_after_folder_hide($folder_id, $attached_file) {
}
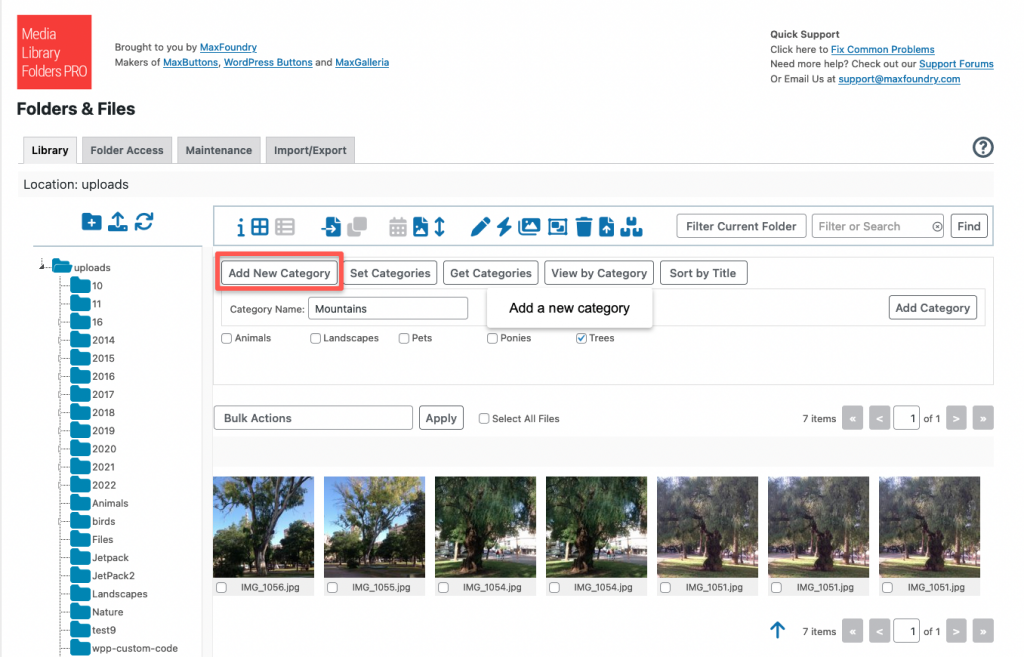
mlfp_before_add_category
add_action(‘mlfp_before_add_category’, ‘do_before_add_category’);
Parameters
$new_category – category to add
function do_before_add_category($new_category) {
}
mlfp_after_add_category
add_action(‘mlfp_after_add_category’, ‘do_after_add_category’);
Parameters
$new_category – category added
$term_id – new term ID
$term_taxonomy_id – term taxonomy ID
function do_before_add_category($new_category, $term_id, $term_taxonomy_id){
}
mlfp_before_sync_file
add_action(‘mlfp_before_sync_file’, ‘do_before_sync_file’);
Parameters
$new_attachment – file to import
$parent_folder – parent folder
$new_file_title – file title
$mlp_alt_text – alt text
$mlp_title_text – text title
function do_before_sync_file($new_attachment, $parent_folder, $new_file_title, $mlp_alt_text, $mlp_title_text) {
}
mlfp_after_sync_file
add_action(‘mlfp_after_sync_file’, ‘do_after_sync_file’);
Parameters
$new_attachment – file to import
$parent_folder – parent folder
$new_file_title – file title
$mlp_alt_text – alt text
$mlp_title_text – text title
$attach_id – ID of the imported file
$absolute_path – absolute path to the imported file
$file_url – URL to the imported file
function do_after_sync_file($new_attachment, $parent_folder, $new_file_title, $mlp_alt_text, $mlp_title_text, $attach_id, $absolute_path, $file_url) {
}
mlfp_before_thumbnail_regen
add_action(‘mlfp_before_thumbnail_regen’, ‘do_before_thumbnail_regen);
Parameters
$attachment_id – id of the image
$attachment_path – path to the image
function do_before_thumbnail_regen($attachment_id, $attachment_path) {
}
mlfp_after_thumbnail_regen
add_action(‘mlfp_after_thumbnail_regen’, ‘do_after_thumbnail_regen’);
Parameters
$attachment_id – id of the image
$attachment_path – path to the image
$metadata – metadata for regenerate file
function do_after_thumbnail_regen($attachment_id, $attachment_path, $metadata) {
}
mlfp_before_add_to_mg
add_action(‘mlfp_before_add_to_mg’, ‘do_before_add_to_mg’);
Parameters
$attachment_id – ID of file to add
$attachment – Post object of the attachment
$gallery_id – ID of the destination gallery
$menu_order – next available free spot at the end of the gallery
function do_before_add_to_mg($attachment_id, $attachment, $gallery_id, $menu_order) {
}
mlfp_after_add_to_mg
add_action(‘mlfp_after_add_to_mg’, ‘do_after_add_to_mg’);
Parameters
$attachment_id – ID of file to add
$attachment – Post object of the attachment
$gallery_id – ID of the destination gallery
$menu_order – next available free spot at the end of the gallery
function do_after_add_to_mg($attachment_id, $attachment, $gallery_id, $menu_order);
mlfp_before_add_to_nextgen
add_action(‘mlfp_before_add_to_nextgen’, ‘do_before_add_to_nextgen’);
Parameters
$attachment_id – ID of the file
$image_location – image URL
$image_path – path to the image
$gallery_id – destination gallery
$gallery_location – location of gallery images
function do_before_add_to_nextgen($attachment_id, $image_location, $image_path, $gallery_id, $gallery_location) {
}
mlfp_after_add_to_nextgen
add_action(‘mlfp_after_add_to_nextgen’, ‘do_after_add_to_nextgen’);
Parameters
$attachment_id – ID of the file
$image_location – image URL
$image_path – path to the image
$gallery_id – destination gallery
$gallery_location – location of gallery images
$image_id – ID of image in Nextgen
function after_add_to_nextgen($attachment_id, $image_location, $image_path, $gallery_id, $gallery_location, $image_id) {
}
mlfp_before_upload_to_cloud
add_action(‘mlfp_before_upload_to_cloud’, ‘do_before_upload_to_cloud’);
Parameters
$location – relative location of the file
$filename – path to the file
$next_id
function do_before_upload_to_cloud($location, $filename, $next_id) {
}
mlfp_after_upload_to_cloud
add_action(‘mlfp_after_upload_to_cloud’, ‘do_after_upload_to_cloud’);
Parameters
$location – relative location of the file
$filename – path to the file
$next_id – current image ID
$sizes – array of thumbnail sizes
function do_after_upload_to_cloud($location, $filename, $next_id, $sizes) {
}
mlfp_before_download_from_cloud
add_action(‘mlfp_before_download_from_cloud’, ‘do_before_download_from_cloud’);
Parameters
$location – relative location of the file
$source_file – destination path
$attach_id – ID of the file
$remove – Remove from cloud (true or false)
$get_thumbnails download thumbnail images (true or false)
function do_before_download_from_cloud($location, $source_file, $attach_id, $remove, $get_thumbnails) {
}
mlfp_after_download_from_cloud
add_action(‘mlfp_after_download_from_cloud’, ‘do_after_download_from_cloud’);
Parameters
$location – relative location of the file
$source_file – destination path
$attach_id – ID of the file
$remove – Remove from cloud (true or false)
$get_thumbnails download thumbnail images (true or false)
function do_after_download_from_cloud($location, $source_file, $attach_id, $remove, $get_thumbnails) {
}