With its initial release, the Media Library Folders Pro S3 + Spaces add-on for Media Library Folders Pro lets you upload files to your WordPress Media Library and automatically offload them to an Amazon S3 bucket.
Now, with the latest release, you can also go in the other direction with brand new features that add support for S3 notifications and cloud synchronization.
That is, you can upload files directly to your Amazon S3 bucket and then sync those changes to your WordPress Media Library, automatically adding files to your WordPress Media Library as needed. These new features will give you even more control over how you work with media files in WordPress and Amazon S3.
In this post, we’ll share more about what these new features do, and then we’ll show you how to set them up with the Media Library Folders Pro S3 + Spaces add-on so that you can start benefiting from this new functionality at your WordPress site.
New Features: S3 Notifications & Cloud Synchronization
With the latest release of the Media Library Folders Pro S3 + Spaces add-on, you can take advantage of two new features to upload files straight to your Amazon S3 bucket and sync them to your WordPress site:
- Cloud notifications, via Amazon’s Simple Notification System (SNS)
- Cloud sync
With cloud notifications, your S3 bucket will notify your WordPress site whenever a file in your S3 bucket has been added, moved, or deleted. Media Library Folders Pro S3 will then process this change and automatically update your WordPress Media Library to reflect the change.
With cloud sync, you’ll get a new option in your Media Library Folders Pro S3 dashboard that lets you sync changes with your S3 bucket. Specifically, Media Library Folders Pro S3 will download a list of files in the bucket and check your WordPress Media Library for each original file (it will not check thumbnail images). If it finds an original file that isn’t already part of your WordPress Media Library, it will automatically generate thumbnail images and upload them to your S3 bucket.
The key difference is that cloud notifications happen automatically whenever you change or upload a file in your S3 bucket, while you’ll need to manually initiate a cloud sync from your WordPress dashboard.
Can You Use Both Features at the Same Time?
While you can enable both features, you’ll typically want to choose just one of the features to use with your site, rather than enabling both at the same time.
This is because the features have some overlap in functionality which makes it redundant to employ both at the same time.
For example, if you’re already using the cloud notifications feature, you likely won’t need to run a cloud sync because those files will have already been added to your WordPress Media Library.
You can pick the approach that works best for your workflows.
Who Can Use the New S3 Notifications & Cloud Synchronization Features?
In order to use these new features, you’ll need both Media Library Folders Pro and the Media Library Folders Pro S3 + Spaces add-on.
With your purchase of the add-on, you can offload and sync up to 500 files for free. This number does not include the thumbnail images that WordPress generates – it only applies to the number of unique images/files that you want to use.
If you need to offload/sync more than 500 files, you can purchase the capability to handle additional files with the following pricing:
- 500 – 10,000 files – $99
- 10,001 – 25,000 files – $199
- 25,001 – 50,000 files – $299
- Unlimited files – $999
Next, let’s get into how you can start using these new features…
How to Set Up S3 Notifications With Media Library Folders Pro S3
To turn on the new S3 notifications feature, you’ll need to define a constant in your wp-config.php file and then configure the Simple Notification Service in your AWS Console.
Here’s your step-by-step guide…
1. Enable Notifications in wp-config.php File and Plugin Settings
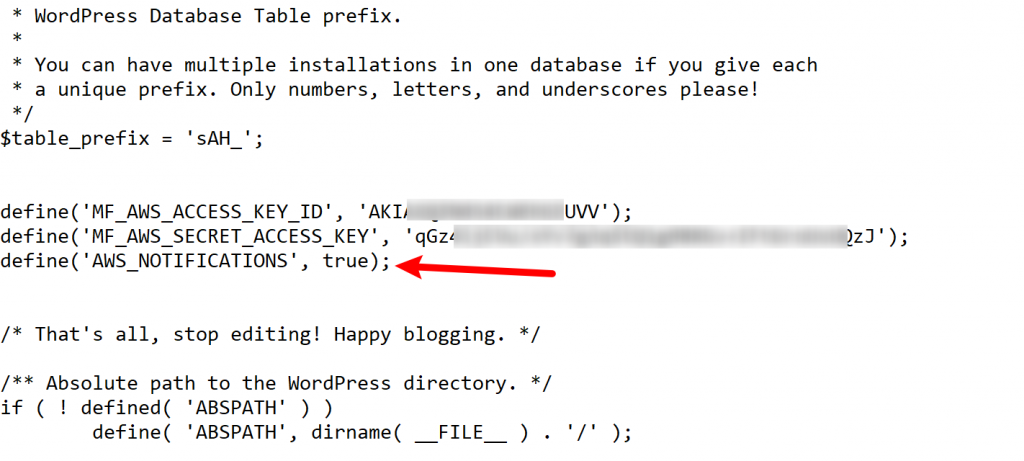
To get started, connect to your WordPress site’s server via FTP and edit your site’s wp-config.php file.
Then, add the following code snippet above the “/* That’s all, stop editing! Happy blogging. */” message:
define(‘AWS_NOTIFICATIONS’, true);
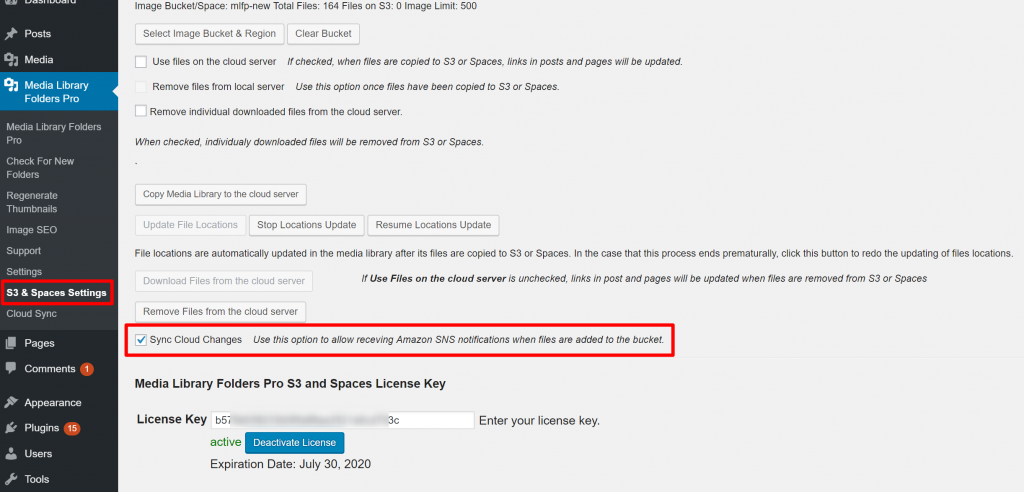
Once you’ve added the snippet to your wp-config.php file, you’ll need to deactivate and then reactivate the Media Library Folders Pro S3 add-on plugin. Once you reactivate the plugin, it will automatically create the new database table that’s necessary for this feature.
Once you’ve deactivated and reactivated the plugin, go to Media Library Folders Pro → S3 & Spaces Settings and check the box to Sync Cloud Changes:
2. Set Up Simple Notification Service in AWS and Add Topics
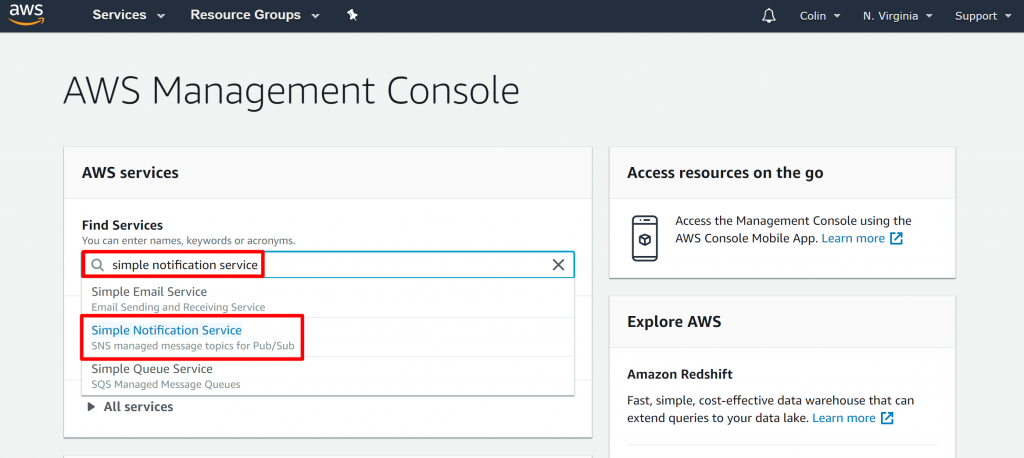
Next, you need to go to your AWS console to configure the Simple Notification Service (SNS).
Log in to your AWS console and search for “Simple Notification Service”:
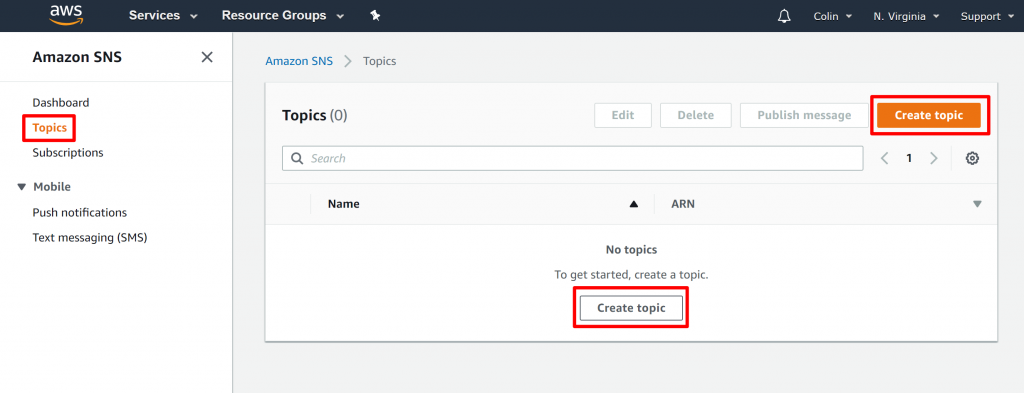
From there, you’ll need to create three “topics”.
To do that, go to the Topics area and select Create Topic:
Enter the following information:
- Topic Name: mlfp-put
- Topic Display Name: PutObj
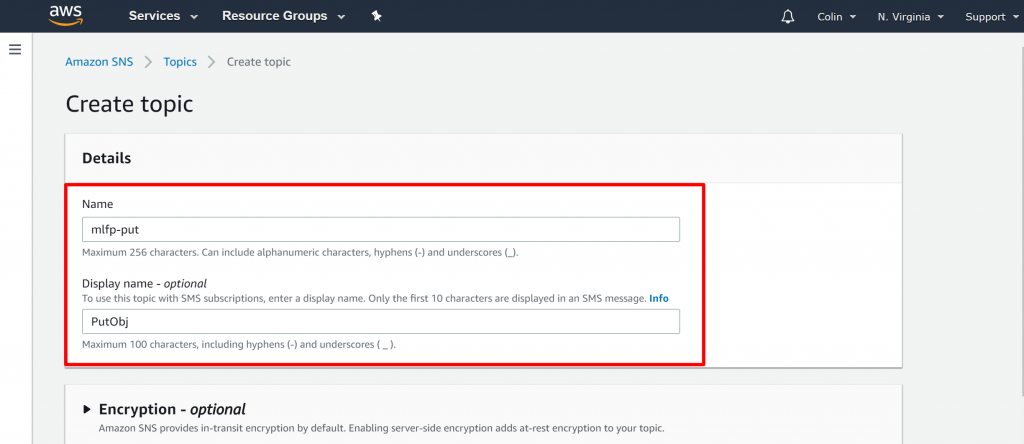
Then, click Create Topic to create your first topic.
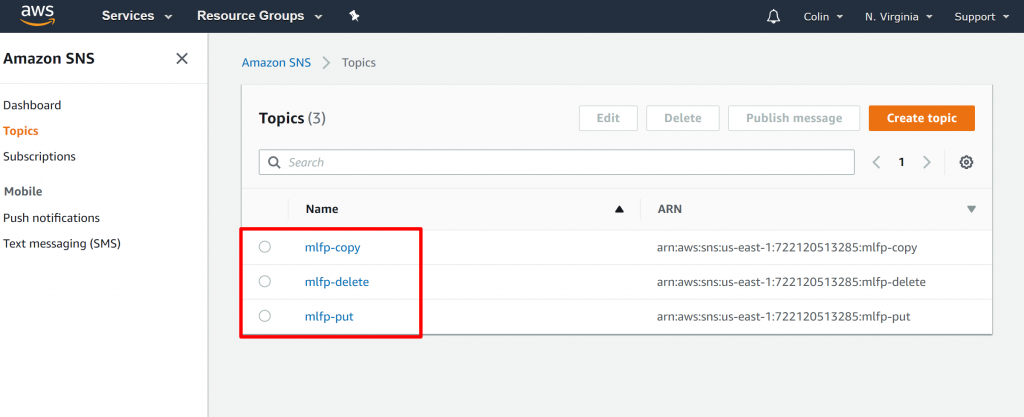
Repeat the process to create two more topics with the following details:
Topic #2:
- Topic Name: mlfp-delete
- Topic Display Name: DelObj
Topic #3:
- Topic Name: mlfp-copy
- Topic Display Name: CopyObj
When you’re finished, you should see something like this:
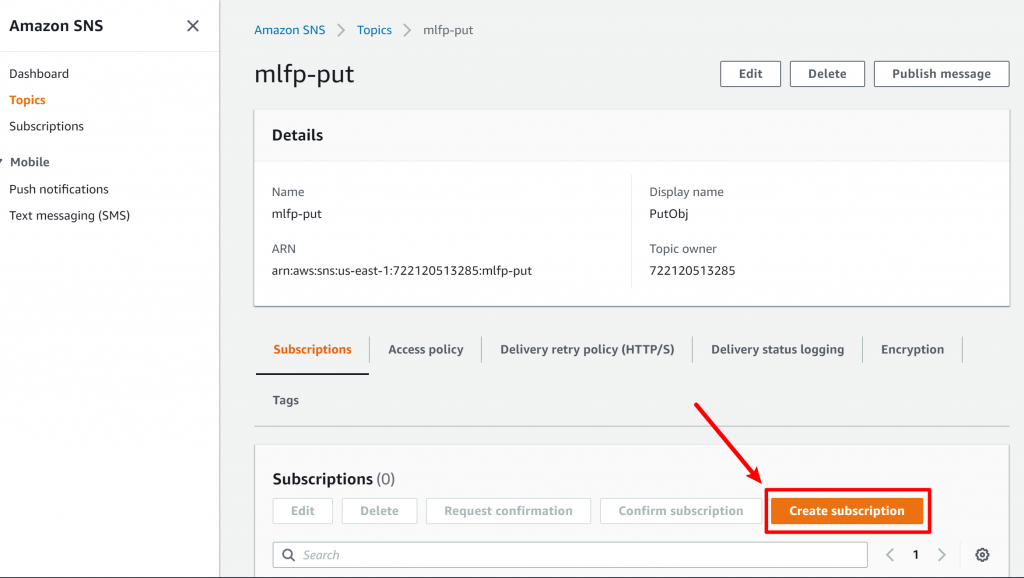
3. Create Topic Subscriptions
Next, click on the mlfp-put topic to open its dashboard. Then, scroll down to the Subscriptions section and click the Create subscription button:
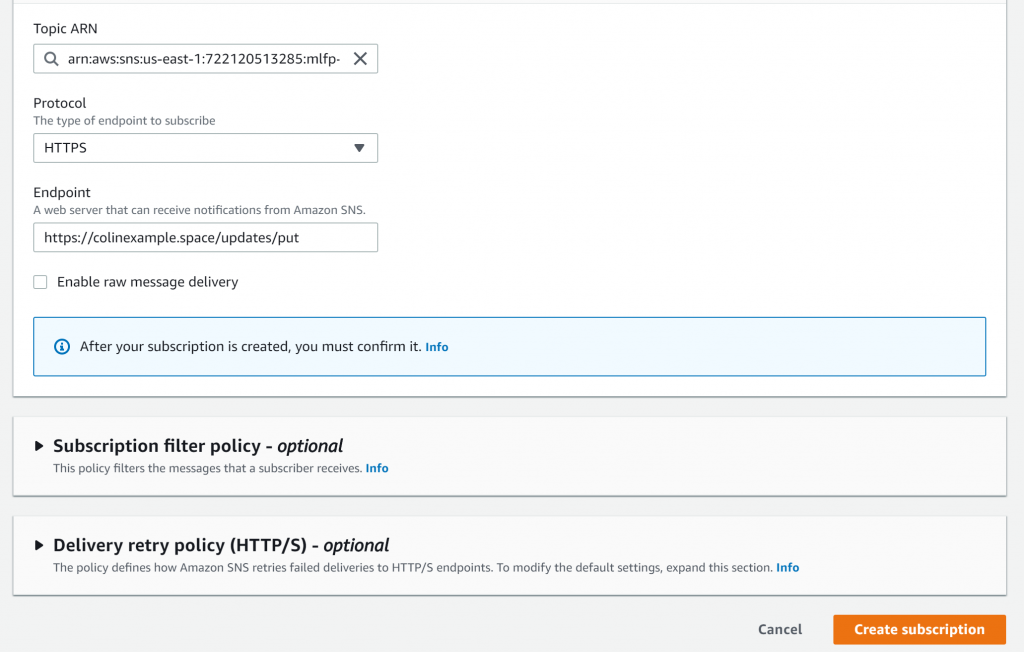
On the next page, use the Protocol option to select HTTP or HTTPS – make sure to select the actual protocol that your site uses. For example, if your site starts with “https://”, then you’d select HTTPS from the drop-down.
Once you’ve selected the protocol, add the following URL to the Endpoint box:
https://yoursite.com/updates/putMake sure to replace “https://yoursite.com” with your site’s real domain name.
Then, click the Create subscription button to finalize the process:
Now, repeat the process for the mlfp-copy and mlfp-delete topics. Only this time, you’ll use different endpoint URLs for the other two topics:
- mlfp-copy – https://yoursite.com/updates/copy
- mlfp-delete – https://yoursite.com/updates/delete
Again, make sure to replace the placeholder with your site’s real URL.
4. Associate Topics/Subscriptions with S3 Bucket Events
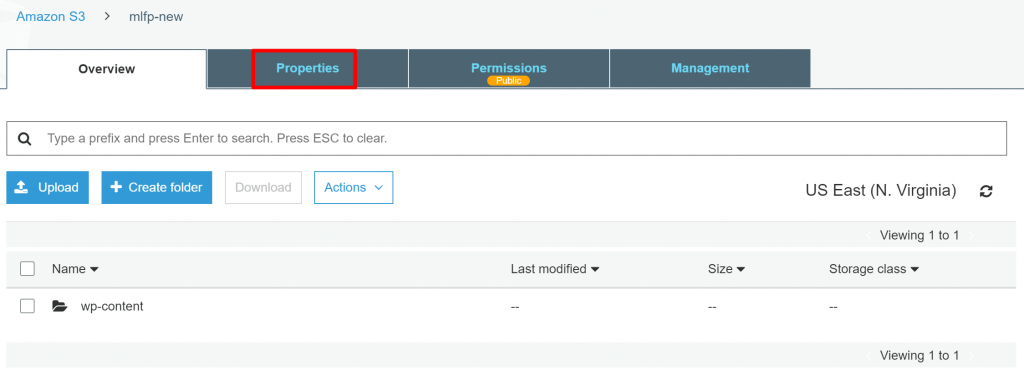
Next, you’ll need to associate the topics and subscriptions that you just created with events in your S3 bucket.
To do that, open the S3 service in your AWS console. Then, select your WordPress site’s S3 bucket and click the Properties tab:
Then, scroll down to the Advanced Settings section and select Events:
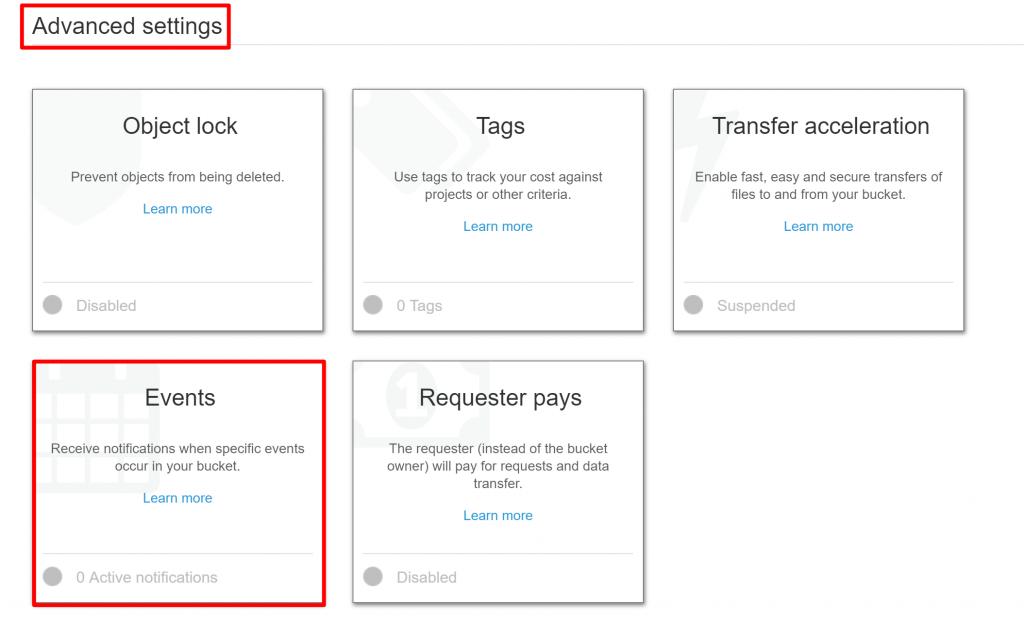
Click + Add Notification.
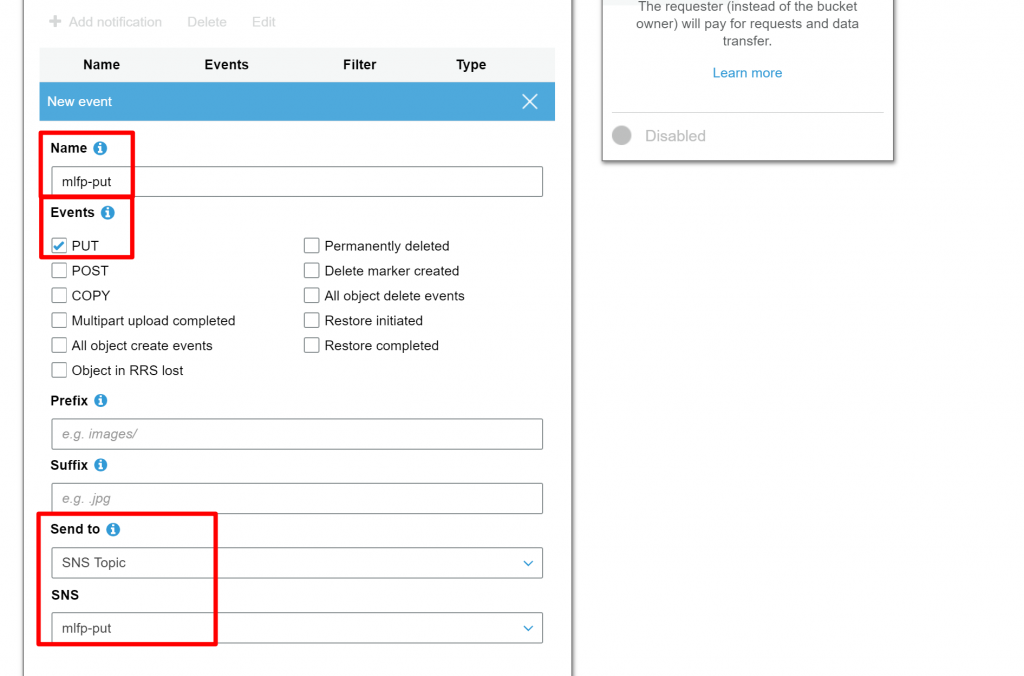
In the Name field, enter mlfp-put. Then, select PUT under the Events section.
Finally, scroll down to the Send to drop-down and select SNS Topic. Then, select mlfp-put from the SNS drop-down.
Then, click Save:
Repeat the process to create two more events for your other two SNS topics. When you create events for the other two topics, make sure to select the event that connects to your topic. That is:
- mlfp-copy – select Copy
- mlfp-delete – select Post
How to Set Up Cloud Synchronization with Media Library Folders Pro S3
The process for enabling the cloud synchronization feature is a little simpler. All you need to do is enable the feature in your wp-config.php file – there are no steps to complete in the AWS Console.
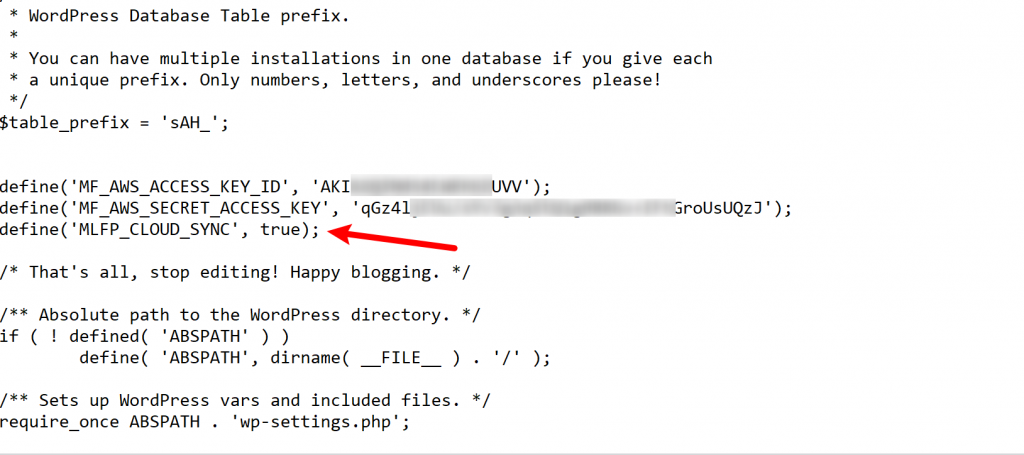
To get started, connect to your WordPress site’s server via FTP and edit your wp-config.php file. Then, add the following code snippet above the “/* That’s all, stop editing! Happy blogging. */” message:
define(‘MLFP_CLOUD_SYNC’, true);
Once you’ve added the code snippet to your wp-config.php file, you’ll need to deactivate and then reactivate the Media Library Folders Pro S3 plugin so that the plugin can add two tables to your database.
Once you reactivate the plugin, it will automatically create the tables – there’s no need for any manual action on your part.
From there, you can access the sync feature from the new Media Library Folders Pro → Cloud Sync area in your WordPress dashboard.
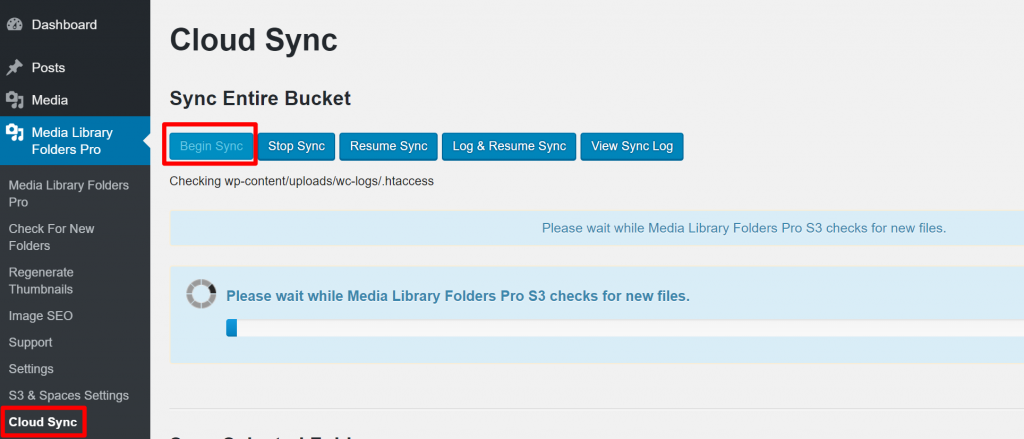
Before performing a sync, we highly recommend taking a recent backup of your WordPress database.
Once you have a backup of your WordPress database, you can click Begin Sync to start the sync process, which might take several minutes depending on the number of files involved:
If the plugin finds a file in your S3 bucket that isn’t already part of your WordPress Media Library, the plugin will add that file to your Media Library and also automatically generate and upload the relevant thumbnail images to your S3 bucket.
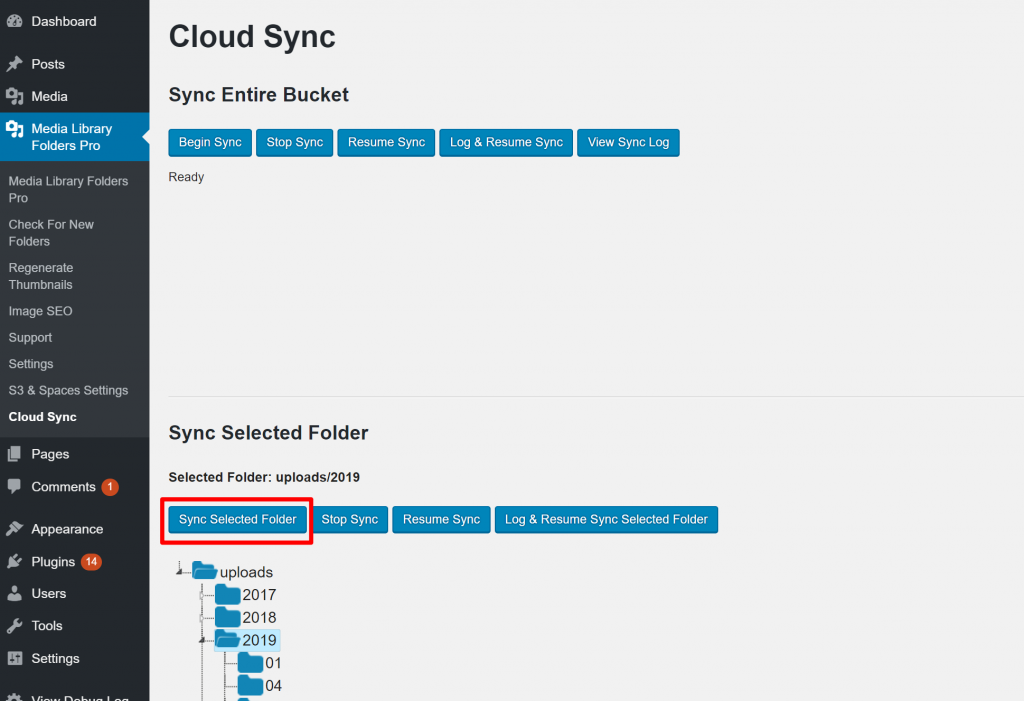
If needed, you can use the other buttons to pause, stop, and resume the sync process. You can also use the Log & Resume Sync button to log files that could not be synced.
In addition to syncing your entire WordPress Media Library, you can also use the Sync Selected Folder section to sync individual folders and their contents:
Get Started With S3 Notifications & Cloud Synchronization Today!
With the Media Library Folders Pro S3 + Spaces add-on’s new S3 notifications and cloud synchronization features, you can now sync files between your WordPress site and an S3 bucket in both directions.
This gives you more flexibility than ever before to integrate Amazon S3 into your WordPress site and workflows.
If you’re not already using Media Library Folders Pro S3 + Spaces, purchase a license today and integrate your WordPress site with Amazon S3 today.