These are the steps to follow in setting up your S3 bucket and activate the Media Library Folders Pro S3 license key.
1. Before configuring Media Library Folders Pro S3 & Spaces please backup you database and your uploads folder.
2. If you purchased a license key, go to the Cloud Storage page, License tab and enter it in the place provided and click the ‘Save Changes’ button. Then click the ‘Activate License’ button. Media Library Folders Pro S3 does not require a license if storing less than 500 files.
3. Make sure that any folders added to your media library by plugins are denoted as hidden folders (right click on each of these folders and select ‘Hide this folder’) to insure that its subfolders and files will not be removed.
4. Go to the Media Library Folders Pro Cloud Storage, Cloud Setup tab. Choose the Cloud Storage Type, AWS S3 or Spaces.
5a. On the Cloud Setup tab, choose where to store the API keys, in the wp-config.php file (this is the most secure option) or in the database. If the database option is selected, Access Key ID and Secret Access Key fields will be displayed on the Cloud Setup tab page.
Instructions for obtaining the API keys are provided below. DigitalOcean Spaces users skip to 5b.
Log into your AWS Console and select IAM. Enter a user name. Under access type select ‘Programmatic Access’. Click ‘Next: Permissions’ and at the bottom of the page click ‘Next: Review’. Click ‘Create user’ which will generate the user security credentials, Access Key ID and a Secret Access Key which must be copied and stored in a safe place.
These API keys can be stored in your wp-config.php file, which is the most secure way to store your API keys. In your wp-config.php file add the keys before the line that says:
/* That’s all, stop editing! Happy blogging. */
Enter the keys like this:
define(‘MF_AWS_ACCESS_KEY_ID’, ‘Your Access Key ID’);
define( ‘MF_AWS_SECRET_ACCESS_KEY’, ‘Your Secret Access Key’);
Now, on the AWS Console, click the Close button. Now we will need to add permissons. Click the new user you just created. On the Summary page, click the Add Permissions button in the Permisions tab.
Under Grant Permissions, click Attach existing policies directly. Click the Create Policy button which will open a new browser tab and then select the JSON tab on the page.
Copy the text below and paste in it place of the current text in the JSON tab.
					{
“Version”: “2012-10-17”,
“Statement”: [
{
“Effect”: “Allow”,
“Action”: [
“s3:CreateBucket”,
“s3:DeleteObject”,
“s3:Put*”,
“s3:Get*”,
“s3:List*”
],
“Resource”: [
“arn:aws:s3:::*”
]
}
]
}
Next, on the Review policy page, enter a name and a descirption of the policy. There should be no spaces in the policy name. Then click the create policy button.
On the next page, you will attach the policy you just created. Type all or part of the policy name in the search box. Select your policy by clicking the radio button next to it and under Policy Actions, select Attach.
Before leaving the AWS Console you can go into S3 and create a bucket for your WordPress media library.
Click the Create Bucket button. Enter the name of your bucket and select an AWS Region.
Under Object Ownership, select ACLs enabled.
Under Block Public Access settings for this bucket, uncheck Block all public access.
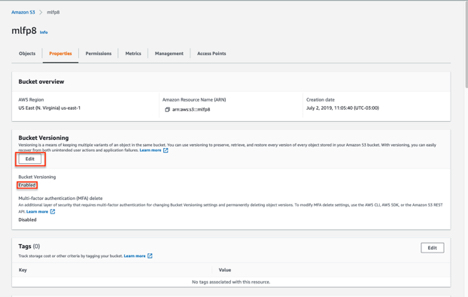
If you want to turn on object versioning, which will save copies of your files if they are replaced or deleted, select enable under Bucket Versioning. Note that AWS will charge for storing the extra files that versioning generates.
After creating the bucket, click on it from the list of buckets and then select the Permissions tab. In the Bucket policy section, click the Edit button and enter the following policy:
{“Version”: “2008-10-17”,
“Statement”: [{“Sid”: “AllowPublicRead”,
“Effect”: “Allow”,
“Principal”: {
“AWS”: “*”
},
“Action”: “s3:GetObject”,
“Resource”: “arn:aws:s3:::YOUR-BUCKET-NAME/*”
}]}
Replace ‘YOUR-BUCKET-NAME’ with the name of your bucket. And then click the Save Changes button.
5b. For DigitalOcean Spaces, create a new space and choose a region. Then go to Applications & API and generate the Access Key ID and a Secret Access Key which must be copied and stored in a safe place.
These API keys can be stored in your wp-config.php which is the most secure way to store them. When adding them to the wp-config.php file, add the keys before the line that says:
/* That’s all, stop editing! Happy blogging. */
define(‘MF_AWS_ACCESS_KEY_ID’, ‘Your Access Key ID’);
define( ‘MF_AWS_SECRET_ACCESS_KEY’, ‘Your Secret Access Key’);
And you will need to define your endpoint, if you are not using the default endpoint of ‘https://nyc3.digitaloceanspaces.com’ like so:
define(‘SPACES_ENDPOINT’,’https://ams3.digitaloceanspaces.com’);
Otherwise, through the Cloud Storage, Cloud Setup tab, the API keys can be stored in the database by selecting Spaces as the Cloud Storage Type and Database for Store API keys and then enter the Access Key ID, Secret Access Key and optional Spaces Endpoint if the default endpoint of nyc3.digitaloceanspaces.com is not used.
8. The final settings to select are:
9. To move your files to your bucket go to the Cloud Files tab. At the top is the information bar that displays the total number of files in the media library (not counting thumbnail images), the number files on the bucket or space, the license file limit, where files are served from and if files are removed when uploaded.
To upload your site’s existing media library files to the bucket or space, ensure that ‘Files will be served from: S3 Bucket:Your Bucket or Space Name’ is displayed in the information bar. If not, go to the Cloud Setup tab and check the ‘Use cloud file links’ option.
However, if you plan to setup a CDN (Content Delivery Network) for your images, do not check the \’Use cloud file links\’ option.
Then click the Copy Media Files to Cloud Storage button which involves three processes:
define(‘WP_DEBUG’, false);
With
define(‘WP_DEBUG’, true);
define(‘WP_DEBUG_LOG’, true);
define(‘WP_DEBUG_DISPLAY’, false);
@ini_set(‘display_errors’, 0);
Then notices, warnings and error for various plugins will be written to an error.log file in the wp-content folder.
Note that the updating of files locations only needs to be successfully done when setting up Media Library Folders Pro S3. After that, the locations of new files added to the site are automatically updated when they are uploaded to the bucket or space.
Once the media library files have been copied to the cloud server, if you are not creating a CDN, you have the option of removing the files from your local server by click the ‘Remove Media Files from Local Server’ button. This will initiate a process that will remove your media library files.
You can restore all your media file to your local server by clicking the ‘Download Media Files from Cloud Storage’ button and you can remove your files by clicking the ‘Remove Media Files from Cloud Storage’ button.
To setup a multi site, start with the main site/blog and follow the above instructions for setup MLFP on Spaces or S3.
Note when files are copied from the main site in the multi site to S3, all media library files for the entire multi site will be uploaded, but only the files in the main blog will have their locations updated. To configure each site of the multi site to use the files that have been copied to the cloud server it will be necessary to visit the Media Library Folders Pro S3 & Spaces Setup page on each site, enter, save and activate the license key, click the ‘Update File Locations’ button and wait for the site’s media library file locations to be updated with their cloud server locations.
There are also two settings that can be used for individual sites in a multisite:
1. Remove files from local server – If you want to remove the copies of files on your local server check this box and after confirmation, your files will be removed.
2. Remove individual downloaded files from the cloud server – Used this option if you want download files to be removed from the server.
Bulk down of files from S3 or Spaces can only be handled on a site wide basis and is done from the S3 & Spaces Setup page on the main site. When removing all files from th cloud server, visit each site and click the Remove Files from S3 button.
Cloud Synchronization is a method for updating your site’s media library from an S3 bucket. It is not required to set up if you do not plan to upload files directly to your S3 bucket. To add files from your S3 bucket to your media library, you can setup and use this method. Note that the files need to be stored under the wp-content/uploads folder on your bucket.
To activate the Cloud Sync feature, add this define to your wp-config.php file:define(‘MLFP_CLOUD_SYNC’, true);Then if Media Library Folders Pro S3 is already activated on your site, deactivate and reactivate to add the mlfp_files_to_sync and the mlfp_s3_update_log tables to the database.To begin a cloud sync, if you are not already making regular backups of your site, you should make a backup copy of your WordPress database. Then go to the Cloud Sync page. When the page is loading, it will be collecting the location of all the files on the bucket and placing them in a table in the database. This make take several minutes.
Once the page finishes loading you will see the word “Ready” display the first row of buttons.
Click the Begin Cloud Sync button to start the process and leave the browser tab open when the syncing is in progress.
With the buttons provided in the Sync Entire Bucket section you are able to pause the sync process using the Stop Sync button, resume syncing, log a problem file and continue syncing and view the sync log of problem files.
When syncing is paused, it is possible to leave the page and later return and press the Resume Sync to continue the previous syncing session. But if the Begin Sync button is click, syncing will start over from the beginning.
If one wants to sync the contents of a single folder, the Sync Selected Folder section of the page allows you to select a particular folder an process the files and folders it contains. The progress of the select folder sync is display in the same area of the page as the entire bucket sync and problem files logged during the sync can viewed using the View Sync Log button in the Sync Entire Bucket section of the page.
If you encounter errors while running the cloud sync, turn on WordPress debugging and rerunning the sync process to determining the cause of the issue. To turn on WordPress debugging, edit the wp-config.php file and change
define(‘WP_DEBUG’, false);
to
define(‘WP_DEBUG’, true); define(‘WP_DEBUG_LOG’, true); define(‘WP_DEBUG_DISPLAY’, false); @ini_set(‘display_errors’, 0);
(Be sure to change this back when you are done.)
This configuration will write warnings, notices and errors to a debug.log file in the wp- content folder. Not all of these message will be related to Media Library Folders Pro.
Do you often update or replace files and images on your AWS S3 bucket linked media library? Do you find it useful to keep copies of your previous files? Well, this release now enables MLFP to work with the object versioning feature of Amazon Web Services to accomplish this seamlessly.
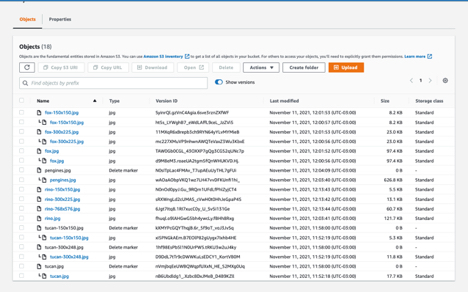
If Media Library Folders Pro is used to replace the file function, S3 will save the previous version of the file which is necessary to retrieve the earlier version, which can be done via the AWS S3 console. Simply view the folder and turn on the “Show Versions” option to view all the previous versions of the files in the folder:
See https://aws.amazon.com/premiumsupport/knowledge-center/s3-undelete-configuration/ for more information.
Object Versioning can be turned on in a bucket’s property’s tab: