MaxGalleria – Swiper JS QuickStart

INDEX

QUICKSTART GUIDE

The Swiper JS addon is now included with MaxGalleria Pro and no additional installations are necessary.

Swiper JS enhances your image galleries with smooth transitions, responsive design, and dynamic visual effects. Whether you’re looking for a clean and simple slider or a visually striking animation, Swiper provides the flexibility and power to deliver professional results with ease.

Configuration Modes: Basic vs. Advanced

To simplify setup while retaining deep customization, MaxGalleria offers two configuration modes.

Basic Mode

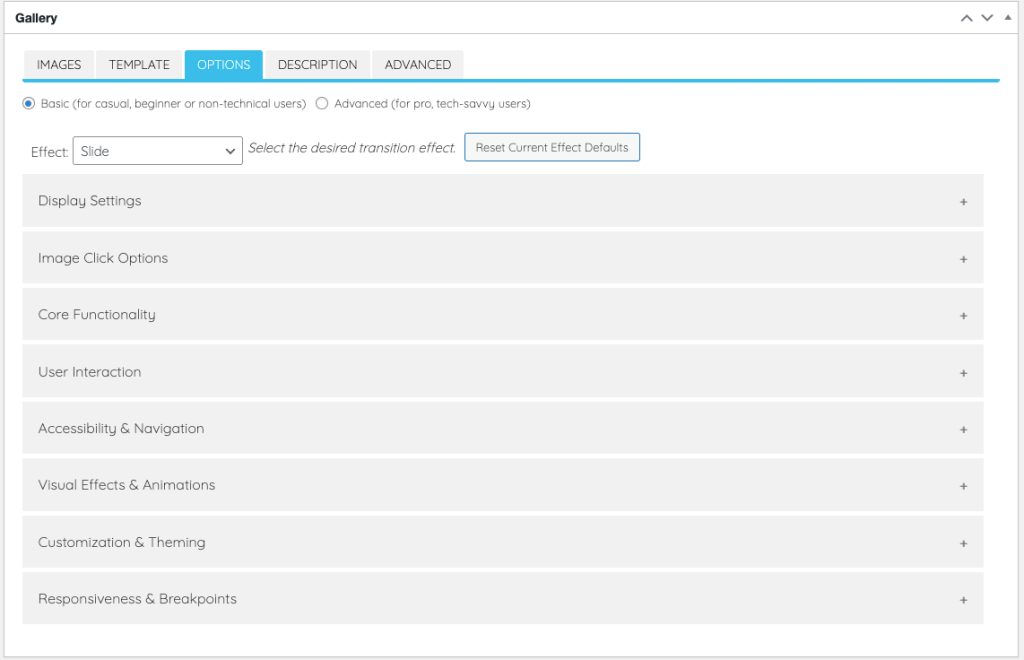
Basic mode is the default configuration. It’s ideal for beginners or for quickly setting up stable sliders with minimal input.

Start by choosing a visual effect:

  • Slide
  • Fade
  • Flip
  • Cube
  • Coverflow
  • Creative
  • Cards

Once an effect is selected, only the essential parameters relevant to that effect are shown.

Great for testing designs or setting up production-ready sliders quickly.

You can also adjust individual settings as needed and, if necessary, click the Reset Current Effect Defaults button to restore the recommended parameters for the selected effect.

Advanced Mode

Advanced mode unlocks all available Swiper JS settings, giving you complete control over:

  • Transition behavior
  • Interaction settings
  • Responsive breakpoints
  • Touch gestures and navigation
  • Custom animations and more

This mode is perfect for power users who want to fine-tune every detail. Keep in mind, however, that using unsupported or conflicting parameter combinations can result in unexpected behavior. If you run into issues, switching back to Basic mode allows you to easily reset problematic configurations.

In Advanced mode, the effect selection is found under the Visual Effects & Animations category.

Quick Setup Guide

Follow these steps to get your Swiper-powered gallery up and running:

  1. Install or Update MaxGalleria Pro
    • Navigate to Plugins > Add New
    • Click Upload Plugin (if installing manually)
    • Activate the plugin once installed
  2. Create a New Gallery
    • In the WordPress dashboard, go to MaxGalleria Pro > Galleries
    • Click Add New Gallery
    • Choose Image as the gallery type (Swiper JS supports image galleries only)
    • Enter a title for your gallery
  3. Choose the Swiper JS Template
    • Go to the Template tab
    • Select Swiper JS Carousel
    • Click Save Draft
  4. Add Your Images
    • Open the Images tab
    • Click Add Images to open the media library
    • Select existing images or drag-and-drop new uploads
    • Click Add to Gallery
    • For best results, use images with consistent dimensions
  5. Configure Your Slider
    • Switch to the Options tab
    • Settings are organized into categories for easier navigation
    • Option Categories:
      • Core Functionality
      • User Interaction
      • Accessibility & Navigation
      • Visual Effects & Animations
      • Customization & Theme
      • Responsiveness & Breakpoints
      • Advanced Functionality (Advanced mode only)
      • Control & Synchronization (Advanced mode only)
      • Display Settings
      • Image Click Options
    • Clicking on any category will expand it to reveal its corresponding options.

Visual Effects & Customization

Swiper JS supports a wide variety of visual effects to enhance your galleries. From subtle fades to immersive 3D transformations, each effect can be customized further in Advanced mode using the full parameter set.

Effects include:

  • Slide – Simple horizontal or vertical movement
  • Fade – Cross-dissolve transitions between slides
  • Flip – 3D flip animation like turning a card
  • Cube – Rotates slides in a 3D cube
  • Coverflow – Staggered, angled slide layout
  • Creative – Fully customizable animation behaviors
  • Cards – Stacked card-like transitions with subtle movement and depth

Some visual effects, such as Cube, Coverflow, Card and Creative, may render content that overflows or appears beyond the original edges of the image frame. This is expected behavior and is part of the visual design of these effects.

In Advanced mode. these can be selected under Visual Effects & Animations.

Options

Image Options – Image options allow one to specify borders and shadows around the slider. There several preset skins (borders), Picture Frame, Picture Show, Drop Shadow, Inner Shade and Custom.

To add a custom border, select ‘Custom’ from the dropdown list, click the Display Border checkbox. Then select the desired border attributes and click the Update button to save your changes. Note, that sometimes, the chosen border radius does not match the border radius of the slider. In these cases, one can use the Image Radius field to adjust and override the currently selected radius.

Image Click Options – Image click options allow one to specify how the slider will react to clicks: enable clicks, specify what the click will open, the WordPress image page, the link enter into the image’s link field or the original image, and if will display in a new tab or the current browser tab.

Swiper JS Options

Visit https://swiperjs.com/swiper-api#parameters to learn more about Swiper JS Slider options.

Swiper JS Carousel options are divided up in the following categories:

  • Display Settings
  • Image Click Options
  • Core Functionality
  • User Interaction
  • Accessibility & Navigation
  • Visual Effects & Animations
  • Customization & Theming
  • Responsiveness & Breakpoints
  • Advanced Functionality (available in advanced mode)
  • Control & Synchronization (available in advanced mode)

Core Functionality

Swiper Enabled – Turns the slider on or off when the page loads.

Swiper Direction – Sets the direction of sliding – horizontal or vertical.

Speed – Controls how fast the slides change (in milliseconds).

Initial Slide – Sets which slide to show first (starts from 0).

Loop – Turns on continuous looping so slides repeat endlessly.

Loop Additional Slides – Adds extra looped slides to ensure smooth transitions.

Loop Add Blank Slides – Adds blank slides if needed when using grid layout or slide grouping.

Loop Prevents Sliding – Stops sliding back to the first slide when you reach the end in loop mode.

Rewind – Lets you jump from the last slide back to the first and vice versa. Don’t use with loop mode.

Allow Slide Next – Blocks swiping or clicking to go to the next slide if set to false.

Allow Slide Prev – Blocks swiping or clicking to go to the previous slide if set to false.

Allow Touch Move – Disables all swiping and touch gestures if set to false.

Slides Per View – Sets how many slides are visible at once, or use ‘auto’ to let it adjust automatically.

Slides Per Group – Moves slides in groups instead of one at a time.

Slides Per Group Auto – With ‘auto’ view and group size of 1, it skips all visible slides when navigating.

Slides Per Group Skip – Lets the first few slides move individually, then groups the rest.

Slides Offset Before – Adds empty space (in pixels) before the first slide.

Slides Offset After – Adds empty space (in pixels) after the last slide.

Space Between – Sets spacing (in pixels) between slides. Avoid adding extra CSS margins.

Centered Slides – Centers the active slide in the middle of the slider.

Centered Slides Bounds – Centers the slides but prevents gaps at the beginning or end. Requires centeredSlides.

Center Insufficient Slides – Centers slides when there aren’t enough to fill the view. Not for use with loop or grid.

Slide To Clicked Slide – Lets you go directly to a slide by clicking it.

One Way Movement – Only allows sliding forward, even if you swipe backward.

Threshold -Sets how far you must swipe (in pixels) before the slide changes.

Watch Slides Progress – Tracks slide visibility and progress; useful for animations and effects.

Watch Overflow – Disables slider and hides navigation if there aren’t enough slides to scroll.

Resize Observer – Uses modern ResizeObserver (if supported) to detect container size changes.

Update On Window Resize – Updates the slider layout when the browser window is resized.

Round Lengths – Rounds slide sizes to whole pixels to avoid blurry text.

Virtual Translate – Animates even hidden slides, useful for some custom behaviors.

Run Callbacks On Init – Fires events like slide change and transition at startup, even if not starting from slide 0.

User Interaction

Grab Cursor – Shows a “grab” cursor on the slider when dragging starts, to indicate it can be moved.

Touch Ratio – Controls how sensitive the slider is to swipe gestures. A higher number means easier swiping, but more chance of accidental slides.

Touch Angle – Sets how diagonal a swipe can be before it is ignored. Helps distinguish vertical scrolling from horizontal swipes.

Touch Release On Edges – Lets touch gestures pass through when swiping at the edges of the slider.

Simulate Touch – Lets desktop users click and drag slides, just like swiping on mobile.

Prevent Default on Touch Start – If disabled, default browser behaviors like scrolling may happen during a swipe.

Touch Events Target – Sets where Swiper should listen for touch input. Use ‘container’ for the main box, or ‘wrapper’ for the inner slide track.

Stop Propagation on Touch Move – Stops the ‘touchmove’ event from bubbling up the DOM, which can help avoid conflicts with parent containers.

Long Swipes – If disabled, longer swipe gestures won’t move the slides.

Long Swipes Ms – Minimum time (in milliseconds) your swipe must last to count as a “long swipe.”

Long Swipes Ratio – How far you must swipe (as a fraction of the slide width) to trigger a move during a long swipe.

Short Swipes – If disabled, quick swipe gestures won’t change slides.

Follow Finger – If turned off, the slide won’t move until you release your finger—it won’t track your swipe in real time.

Passive Listeners – Improves scroll performance by making swipe event listeners passive. Disable this if you need to use e.preventDefault() on touch events.

Prevent Clicks – Prevents accidental clicks on links while swiping through slides.

Prevent Clicks Propagation – Stops the click event from bubbling up during a swipe, which helps avoid triggering other click handlers.

Accessibility & Navigation

Keyboard Navigation – Enable users to navigate slides using the keyboard.

Keyboard In Viewport Only -Limit keyboard navigation to when the Swiper is in the visible area.

Keyboard PageUp/PageDown – Allow PageUp and PageDown keys to move between slides.

Mousewheel Enabled – Enable scrolling through slides with the mousewheel.

Mousewheel Release On Edges – Allow scroll events to pass through when the Swiper reaches the first or last slide.

Mousewheel Invert – Reverse the scroll direction.

Mousewheel Force To Axis – Make scrolling follow the closest slide axis (horizontal/vertical).

Mousewheel Sensitivity – Control how much scrolling is needed to change slides. Higher = more sensitive.

Mousewheel Events Target – Set where the scroll event is captured, like the Swiper container.

Hash Navigation – Change the URL hash as you move through slides for easier linking.

Hash Navigation Replace State – Avoid adding multiple history entries as you slide.

Hash Navigation Watch State – Swiper updates when the URL hash changes.

History Enabled – Let Swiper use the browser history for navigation.

History Root – Define the base URL path for history navigation.

History Replace State – Avoid adding new history entries when changing slides.

History Key – Set a custom key to track Swiper in browser history.

Accessibility (A11y) – Add ARIA attributes and keyboard support for screen readers and improved accessibility.


Pagination

Select the style of pagination (e.g., bullets, fraction, progress bar).

Clickable – Let users click bullets to navigate.

Render Total – Show the total number of slides in the pagination.

Render Visible – Only show bullets for visible slides.

Slides Per Column – Set how many slides appear in a vertical column.

Slides Per Column Fill – Determine how slides are arranged in multi-column layout.

Slides Per Column Centered – Center the slides in the column layout.


Navigation

Enable next/prev buttons.

Next Element (CSS selector) – Set the element used to go to the next slide.

Previous Element (CSS selector) – Set the element used to go to the previous slide.

Navigation Disabled Class – CSS class added to nav buttons when they are disabled.

Navigation Hidden Class – CSS class used to hide nav buttons when not needed.

Navigation Lock Class – CSS class added when nav buttons are locked from use.

Navigation Container Disabled Class – CSS class applied to the Swiper container when nav is disabled.

Unique Nav Elements – Use buttons that are specific to this Swiper instance (not shared globally).

Hide On Click – Hide navigation buttons when the user clicks on the Swiper.


Scrollbar

Enable a draggable scrollbar for navigation.

Scrollbar Element – CSS selector or element to attach the scrollbar to.

Scrollbar Hide – Automatically hide scrollbar when not used.

Scrollbar Draggable – Allow users to drag the scrollbar.

Scrollbar Drag Size – Set the size of the scrollbar handle (auto or specific value).

Scrollbar Snap On Release – Snap to the nearest slide after releasing the scrollbar.

Scrollbar Lock Class – CSS class added when the scrollbar is locked.

Scrollbar Drag Class – CSS class for styling the draggable scrollbar handle.

Scrollbar Disabled Class – CSS class for the scrollbar when it’s disabled.


Lazy Loading

Lazy Preload Previous/Next – How many slides before and after the current one to preload for smoother navigation.

Lazy Preloader Class – CSS class for the loading spinner shown during image lazy loading.
Visual Effects & Animations

Auto Play – Set how many milliseconds between automatic slide changes. Use false to turn off autopla

Disable On Interaction – Stops autoplay when users interact with the Swiper (e.g., swipe or click).

Stop On Last Slide – Stops autoplay when the last slide is reached.

Reverse Direction – Autoplay moves slides in the opposite direction (right to left).

Pause On Mouse Enter – Pauses autoplay when users hover their mouse over the slider.

Auto Height – Adjusts the Swiper container height to match the current slide. Helpful for slides with different heights.

Effects

Choose a slide transition effect like fade, flip, coverflow, cube, creative, or cards.

Fade Effect

Cross Fade – When enabled, the previous slide fades out while the new slide fades in.


Flip Effect

Slide Shadows – Adds shadows to slides during the flip animation.

Limit Rotation – Restricts how far the slide rotates (up to 180°).


Coverflow Effect

Best used with slidesPerView: 3 (or another odd number) and centeredSlides: true.

Coverflow Rotate – How much slides rotate along the Y-axis.

Coverflow Stretch – Spacing between slides along the main axis.

Coverflow Depth – How deep into the screen slides appear, creating a 3D effect.

Coverflow Modifier – Multiplies the intensity of the effect. Higher = more dramatic.

Coverflow Slide Shadows – Adds shadows to enhance the 3D appearance.


Cube Effect

Requires at least 4 slides when loop: true.

Slide Shadows – Adds shadows for each rotating slide.

Shadow – Adds a general shadow around the cube.

Shadow Offset – Moves the cube’s shadow away from the center.

Shadow Scale – Scales the cube shadow for stronger or softer appearance.


Creative Effect

Perspective – Adds 3D depth to transitions.

Limit Progress – Limits how far a slide visually moves offscreen.

Progress Multiplier – Makes transitions more (or less) dramatic by multiplying their movement.

Prev Translate – How far the previous slide moves in 3D space.

Prev Rotate – How much the previous slide rotates.

Prev Opacity – Sets the transparency level of the previous slide.

Prev Scale – Controls the zoom level of the previous slide.

Prev Origin – Where the transition originates from on the previous slide.

Next Translate – Movement of the next slide in 3D space.

Next Rotate – Rotation angle for the next slide.

Next Opacity – Transparency level for the next slide.

Next Scale – Zoom level of the next slide.

Next Origin – Where the transition originates from on the next slide.

Shadow Per Progress – Adds dynamic shadows based on how far each slide is into its transition.


Cards Effect

Slide Shadows – Turns slide shadow on or off.

Rotate – How much each slide is rotated.

Per Slide Offset – How far each slide is moved from the previous one.

Per Slide Rotate – Adds rotation per slide in the stack.


Zoom

Enable zooming on slide content (e.g., images).

Max Ratio – Set how far users can zoom in (e.g., 3 = 3x bigger).

Min Ratio – Set the smallest size users can zoom out to (usually 1 = original size).

Toggle – Allows double-click or tap to zoom in and out.

Container Class – CSS class for the zoom container around slide content.

Zoomed Slide Class – CSS class added when a slide is zoomed in.


Parallax

Parallax Enabled – Adds a depth effect by moving slide content at different speeds than the background.

Customization & Theming

Container Modifier Class – The CSS class added to the Swiper container to modify the Swiper’s appearance or behavior. This class is used to apply different styles or settings based on the Swiper instance.

Slide Active Class – The CSS class added to the currently active slide.

Slide Class – The CSS class applied to all individual slides within the Swiper. This class is used to identify and style the slides.

Slide Blank Class – The CSS class used for blank slides that are added to fill space when loop mode is enabled.

Slide Next Class – The CSS class applied to the next slide in relation to the active slide. Useful for custom styling or transitions for the next slide.

Slide Prev Class – The CSS class applied to the previous slide in relation to the active slide, enabling custom styling or animations for the previous slide.

Slide Visible Class – The CSS class applied to slides that are currently visible within the Swiper’s viewport, even if they’re not the active slide.

Slide Fully Visible Class – The CSS class applied to slides that are fully visible in the Swiper’s viewport.

Wrapper Class – The CSS class applied to the container that wraps all the slides. This class is important for styling and transitions within Swiper.

Pagination Bullet Class – The CSS class applied to individual pagination bullets. You can configure this class to use a custom class for the pagination bullets.

Pagination Element – The CSS selector used for the pagination container. This selector targets the element used to render pagination bullets.

Pagination Current Class – The CSS class applied to the currently active pagination bullet. You can configure this class to use a custom class for the active bullet.

Pagination Clickable Class – The CSS class added when pagination bullets are clickable. You can set a custom class to change the clickable behavior styling.

Pagination Modifier Class – The base class used to modify the appearance of pagination elements. This class is added before the different modifier classes like bullet, current, or clickable. You can customize this class to use a different prefix for pagination-related classes.

Dynamic Bullets – By default, Swiper will render all pagination bullets. If you enable this option, only the amount of bullets that fit in the pagination container will be rendered.

Pagination Dynamic Main Bullets – The number of primary bullets displayed when dynamicBullets is enabled.

Responsiveness & Breakpoints

Swiper JS adapts to different screen sizes using breakpoints. With this plugin, you can fine-tune the slider’s layout based on screen width:

For 320px and 480px screens:

Set the number of visible slides (Slides Per View) and spacing between them (Space Between).

For 768px and 1040px screens:

Customize Slides Per View, Slides Per Group, Space Between, and Coverflow-specific effects like Depth and Rotate.

These options help ensure a smooth and optimized slider experience across all devices.

Grid

Enables the grid layout in Swiper, which allows one to display slides in a multi-row grid format. You can configure the number of rows and how slides fill the grid.

Grid – Enable or disable the grid layout in Swiper.

Grid Rows – The number of rows in the grid.

Grid Fill – The way to fill the grid.